Functionalities marked with 👤 are only accessible by admin users.
This is the multi-page printable view of this section. Click here to print.
Taranis AI Documentation
Each Category represents a core functionality of Taranis AI
- 1: Getting Started
- 1.1: Deployment
- 1.2: Advanced monitoring
- 1.3: Kubernetes deployment
- 1.4: Maintainance
- 1.5: Recommended setup
- 2: Assess
- 3: Analyze
- 4: Publish
- 5: Dashboard
- 6: User settings
- 7: Administration
- 7.1: User Management
- 7.2: OSINT workflow
- 7.3: OSINTSources
- 7.4: Report Types
- 7.5: Bots
- 7.6: Collectors
- 7.7: Connectors
- 7.8: Publishers
- 7.9: Product Types
- 7.10: OpenAPI
- 8: User Stories
- 8.1: User Stories [Admin]
- 8.2: User Stories [Analyst]
- 8.2.1: Workflow [Analyst]
- 9: Contribution Guidelines
1 - Getting Started
Information on how to get started with Taranis AI
Developers
See docker/dev for instructions on how to start at dev setup.
1.1 - Deployment
How to deploy Taranis AI
Clone via git
git clone --depth 1  https://github.com/taranis-ai/taranis-ai
cd taranis-ai/docker/
Configuration
Copy env.sample to .env
cp env.sample .env
Open file .env and change defaults if needed. More details about environment variables can be found here.
Taranis AI images are tagged as follows:
- Official release version number (e.g.
1.1.7) - Every official image release comes with an extra stable tag, in case pinning the release is not favourable (
stable) - Latest tag for tracking the latest uploaded image, there is no guarantee this is an officially released image (
latest)
See Advanced monitoring for more logging insights.
Startup & Usage
TO circumvent the potential reusage of older local images
docker compose pull
Start-up application
docker compose up -d
Use the application
http://<url>:<TARANIS_PORT>/login
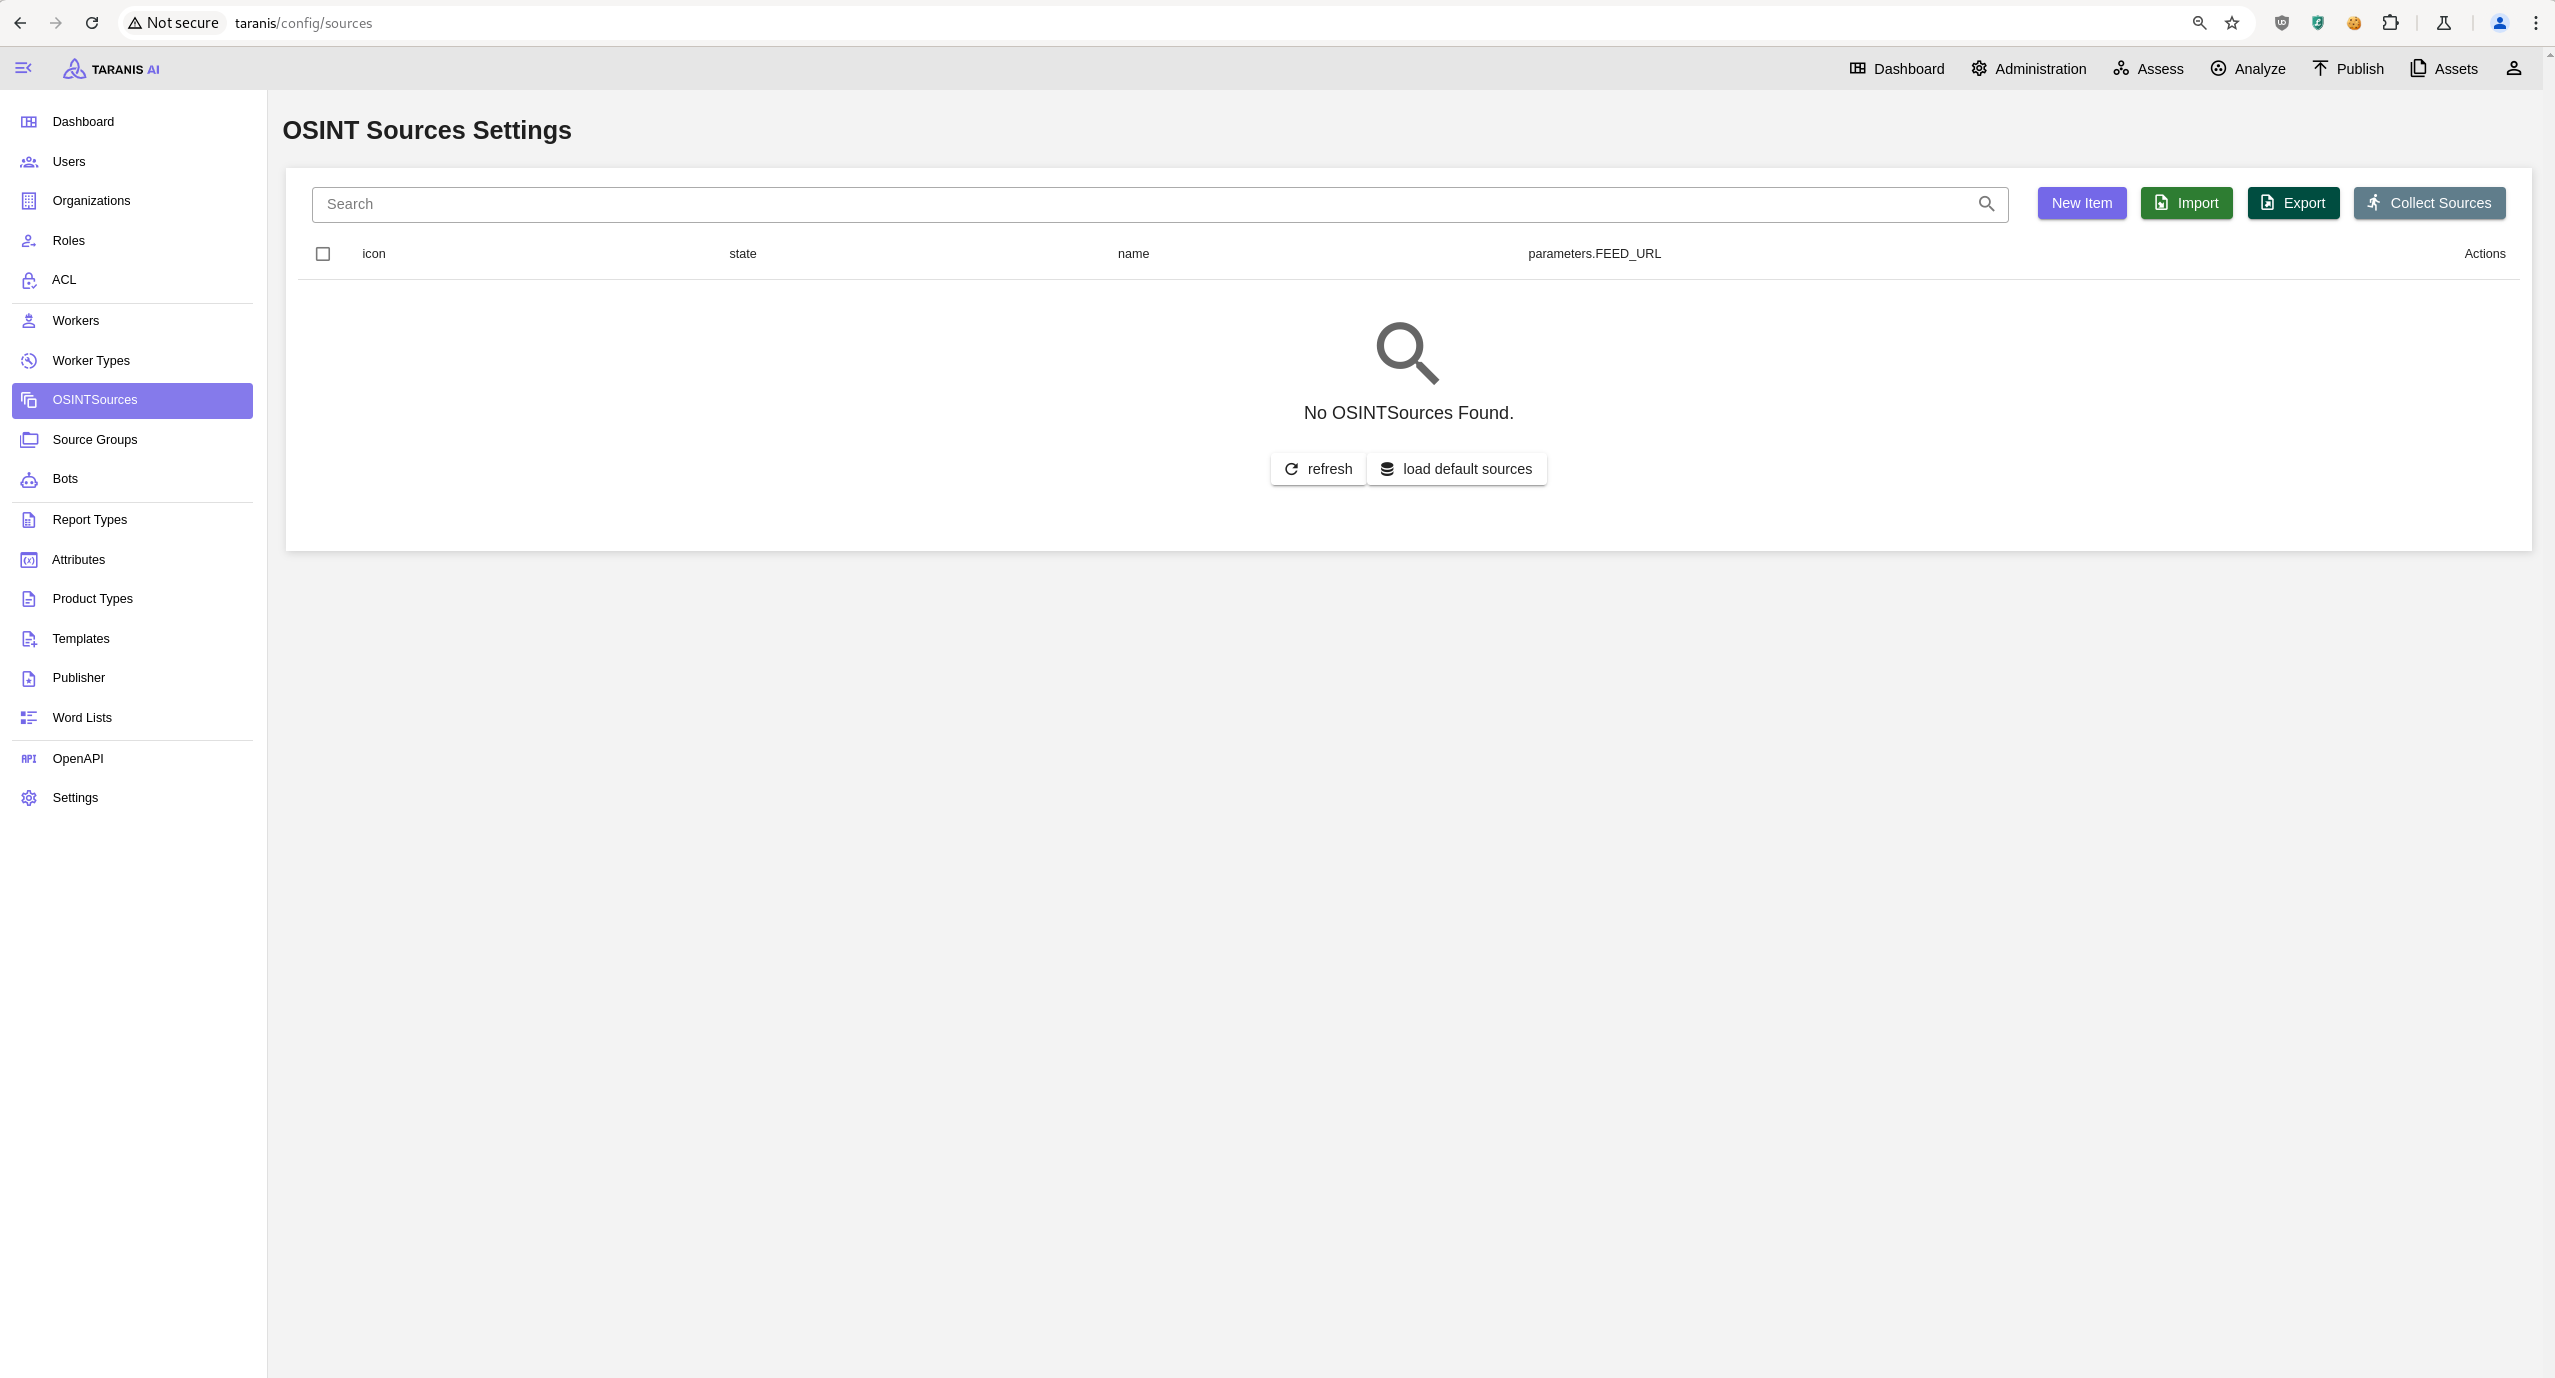
Initial Setup 👤
The default credentials are user / user and admin / admin.
The passwords for these two default users can be overridden by setting the environment variables PRE_SEED_PASSWORD_ADMIN or PRE_SEED_PASSWORD_USER before first launch.
Afterwards they are stored in the database in the user table.
Open http://<url>:<TARANIS_PORT>/config/sources and click load default sources to import the default sources from: default_sources.json
Or import a source export via the Import.
1.2 - Advanced monitoring
Use Sentry for more runtime insights
Prerequisites
- Sentry instance available, either SaaS or self-hosted.
- Follow this guide to have a Sentry project (and
SENTRY_DSN) ready.
What is Sentry
Sentry is a monitoring tool that enables more insights about an application. Taranis AI takes advantage of this if you enable it at the start up.
What is there to monitor
Sentry can be used to monitor insights about GUI, Core and database. In Taranis AI: Issues, Traces, Profiles and Queries can be tracked.
How to enable Sentry in Taranis AI
To enable Sentry, set the SENTRY_DSN variables in the .env file before start of the application. More details about environment variables can be found here.
GUI monitoring
To gain insights about GUI, use the TARANIS_GUI_SENTRY_DSN variable and set it to your Sentry DSN address.
Core and database monitoring
To gain insights about Core and database, use the TARANIS_CORE_SENTRY_DSN variable and set it to your Sentry DSN address.
1.3 - Kubernetes deployment
How to deploy Taranis AI on Kubernetes
Configuration
Clone via git
git clone --depth 1  https://github.com/taranis-ai/taranis-ai
cd taranis-ai/docker/
Copy env.sample to .env
cp env.sample .env
Open file .env and change defaults if needed. More details about environment variables can be found here.
See Advanced monitoring for more logging insights.
Convert via Kompose
Download and install kompose.io
# resovle variables from .env into taranis-ai/docker/compose.yml
docker compose config > resolved-compose.yml

# convert compose file to kubernetes
kompose --file resolved-compose.yaml convert
1.4 - Maintainance
How to upgrade database of Taranis AI
Supported upgrade of PostgreSQL 14.x to PostgreSQL 17.x. This upgrade is capable of upgrading a fully running instance of Taranis AI. Expect Taranis AI downtime during the process of the upgrade.
Prerequisites
- Installed Docker Compose V2 or podman-compose
- Running Taranis AI deployment using the
docker/compose.ymlfile. - Running database PostgreSQL of major version 14
- Compose file (
docker/compose.yml) is setup to use the image of PostgreSQL 17 (check yourPOSTGRES_TAGvariable in the.envfile)
Steps to upgrade
- Go to directory:
taranis-ai/docker - Ensure the script
upgrade-database.shis executable - Run the script:
./upgrade-database.sh
All containers should now be again up and running!
1.5 - Recommended setup
Minimal recommended setup for Taranis AI
For the best experience, we recommend the following minimal requirements for Taranis AI:
Resolution: FullHD or more
Browser:
- Chromium
- Mozilla Firefox
- Microsoft Edge
2 - Assess
Assessing News Items and Stories
Description
Assess displays a list of collected news items from various sources, which can be searched, filtered, and sorted based on different attributes (see Filters). Furthermore, news items can be merged, added to reports, analyzed and have their state changed (see Items).
Functionalities
Filters
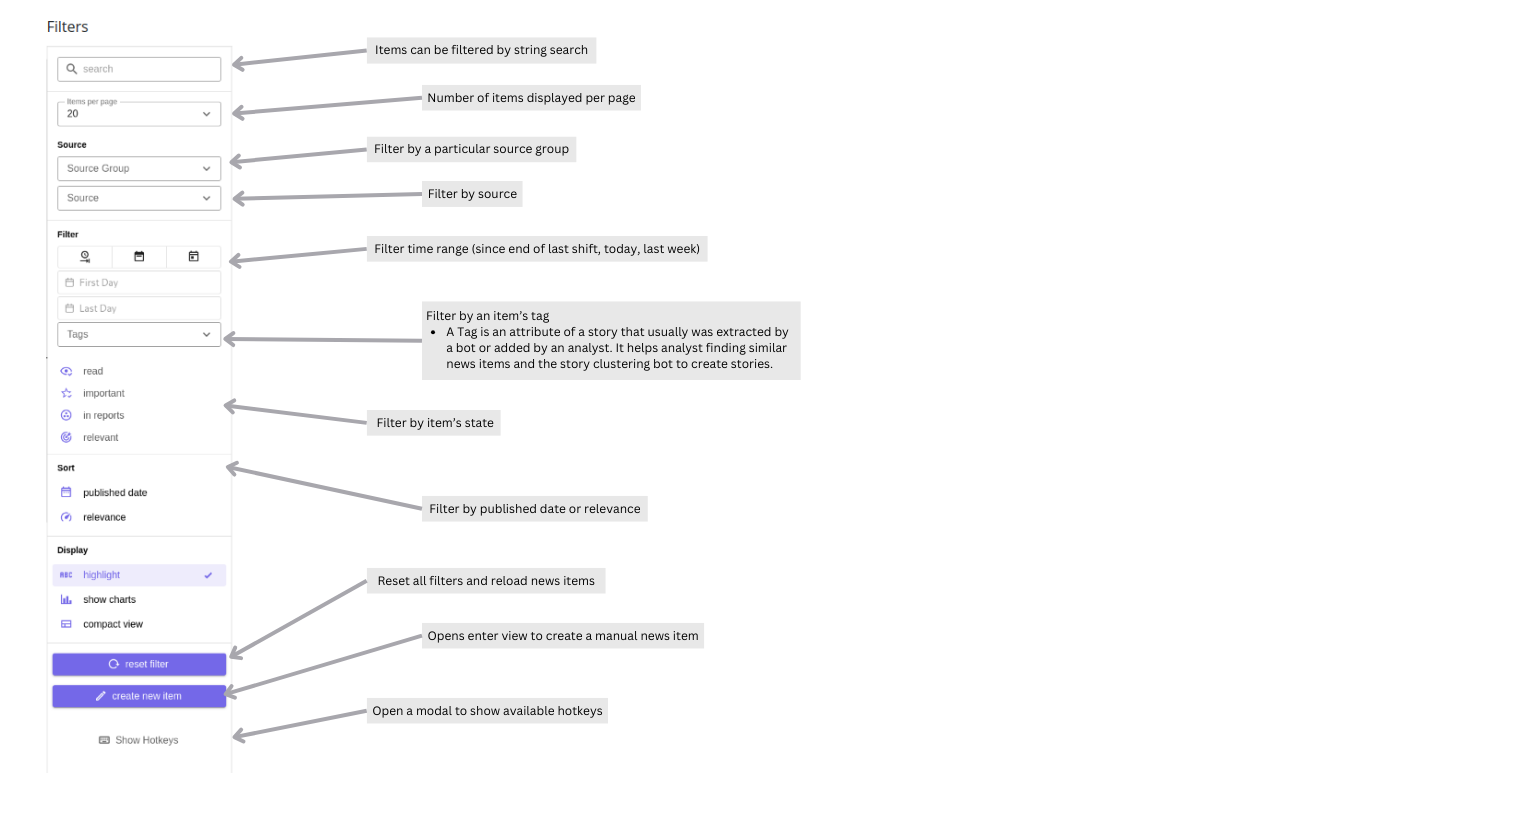
Details:
- First Day: The Story’s creation date, typically matching the oldest News Item’s “published date.”
- Last Day: The Story’s update date, usually reflecting the latest addition or change.
For manually created stories, the “updated” timestamp is essentially the creation time. As a result, filtering by Last day for a manually created story will not return it, even if an older “published date” is set.
Items
News items collected by Collectors become visible in the Assess section. These items can later be grouped by context, either automatically by the Bots or manually.

Detail view:
- Relevance of item/aggregate can be changed with “up/down” buttons
Charts:
- Each item displays a chart if data has been aggregated in the last 7 days.
- Line and bar chart display the same data, which is the accumulation of items per day.
- The y-axis of the line chart can be adapted and is the same for all charts in the current items list. Therefore, charts can be compared properly.
3 - Analyze
Analyze displays a list of all report items. They can be created, edited, deleted and filtered.
Description
Different types of reports can be created. Those types can be managed by the admin user in the Administration/Report Types endpoint (see Report Types).
After one of the next releases, it will also be possible to create products from reports.
Functionalities
CRUD
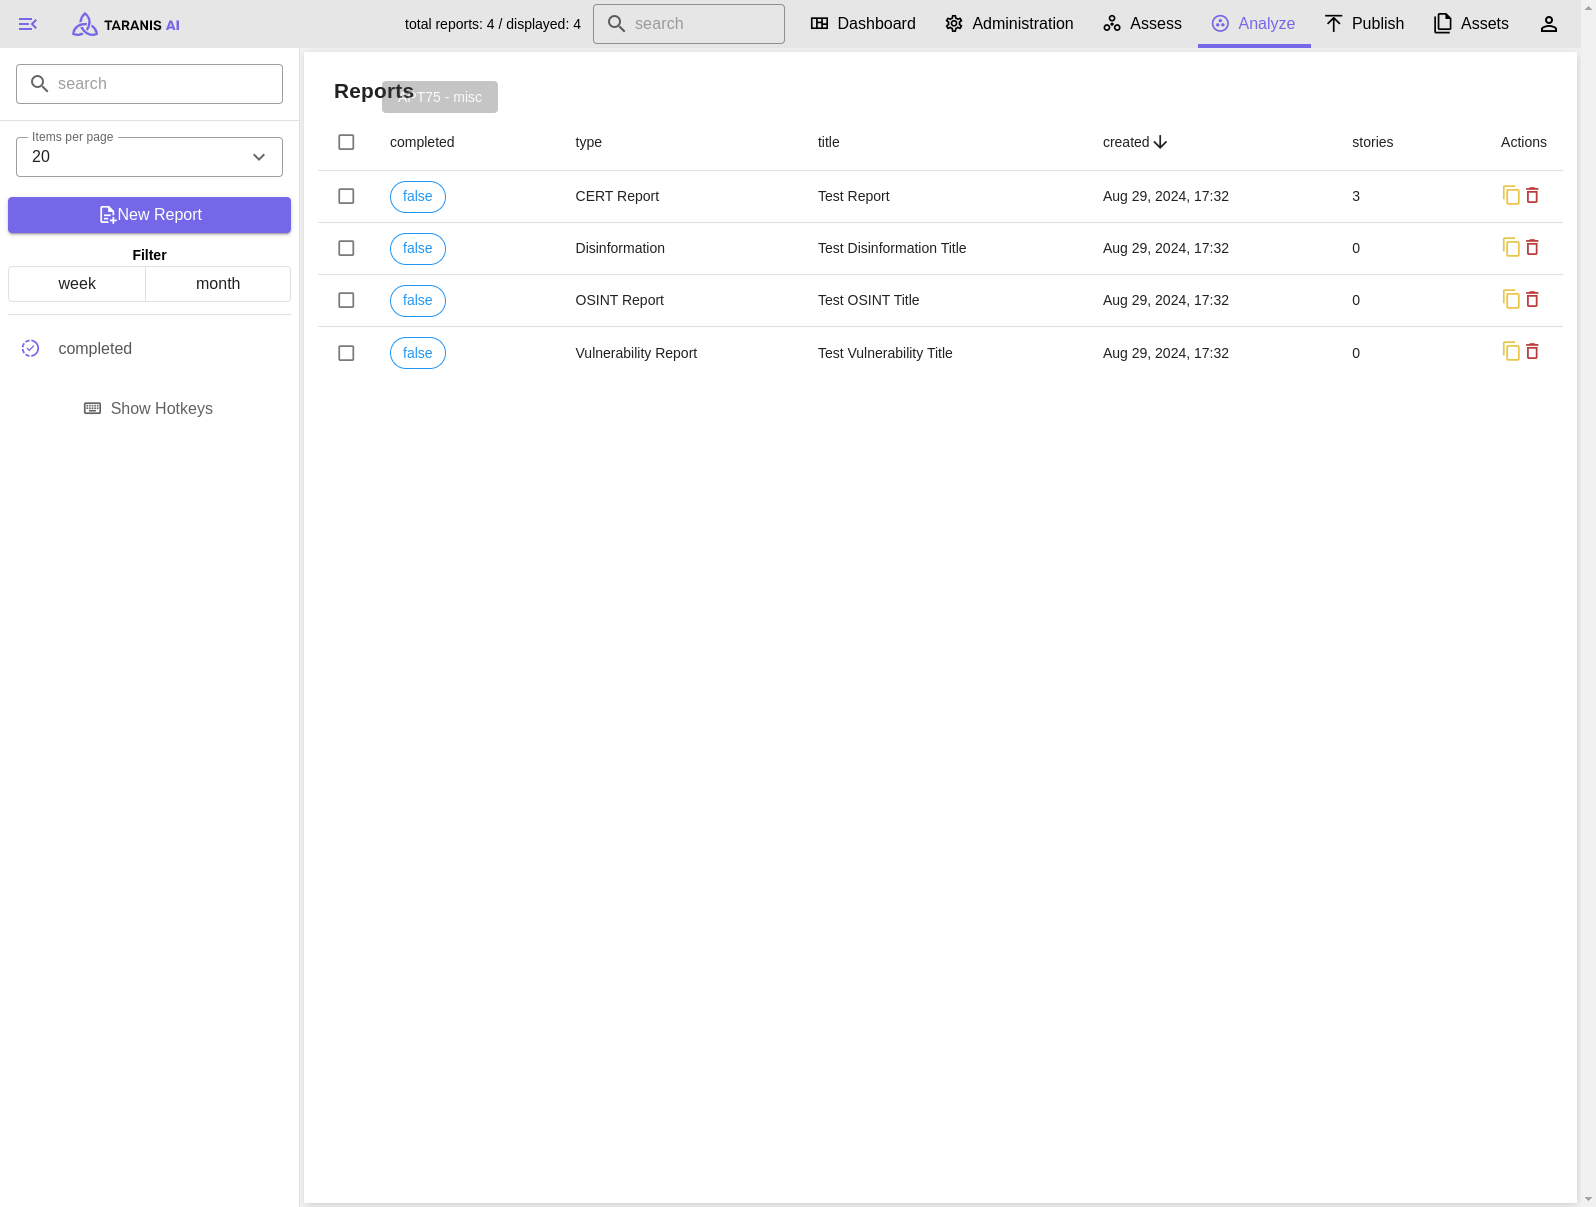
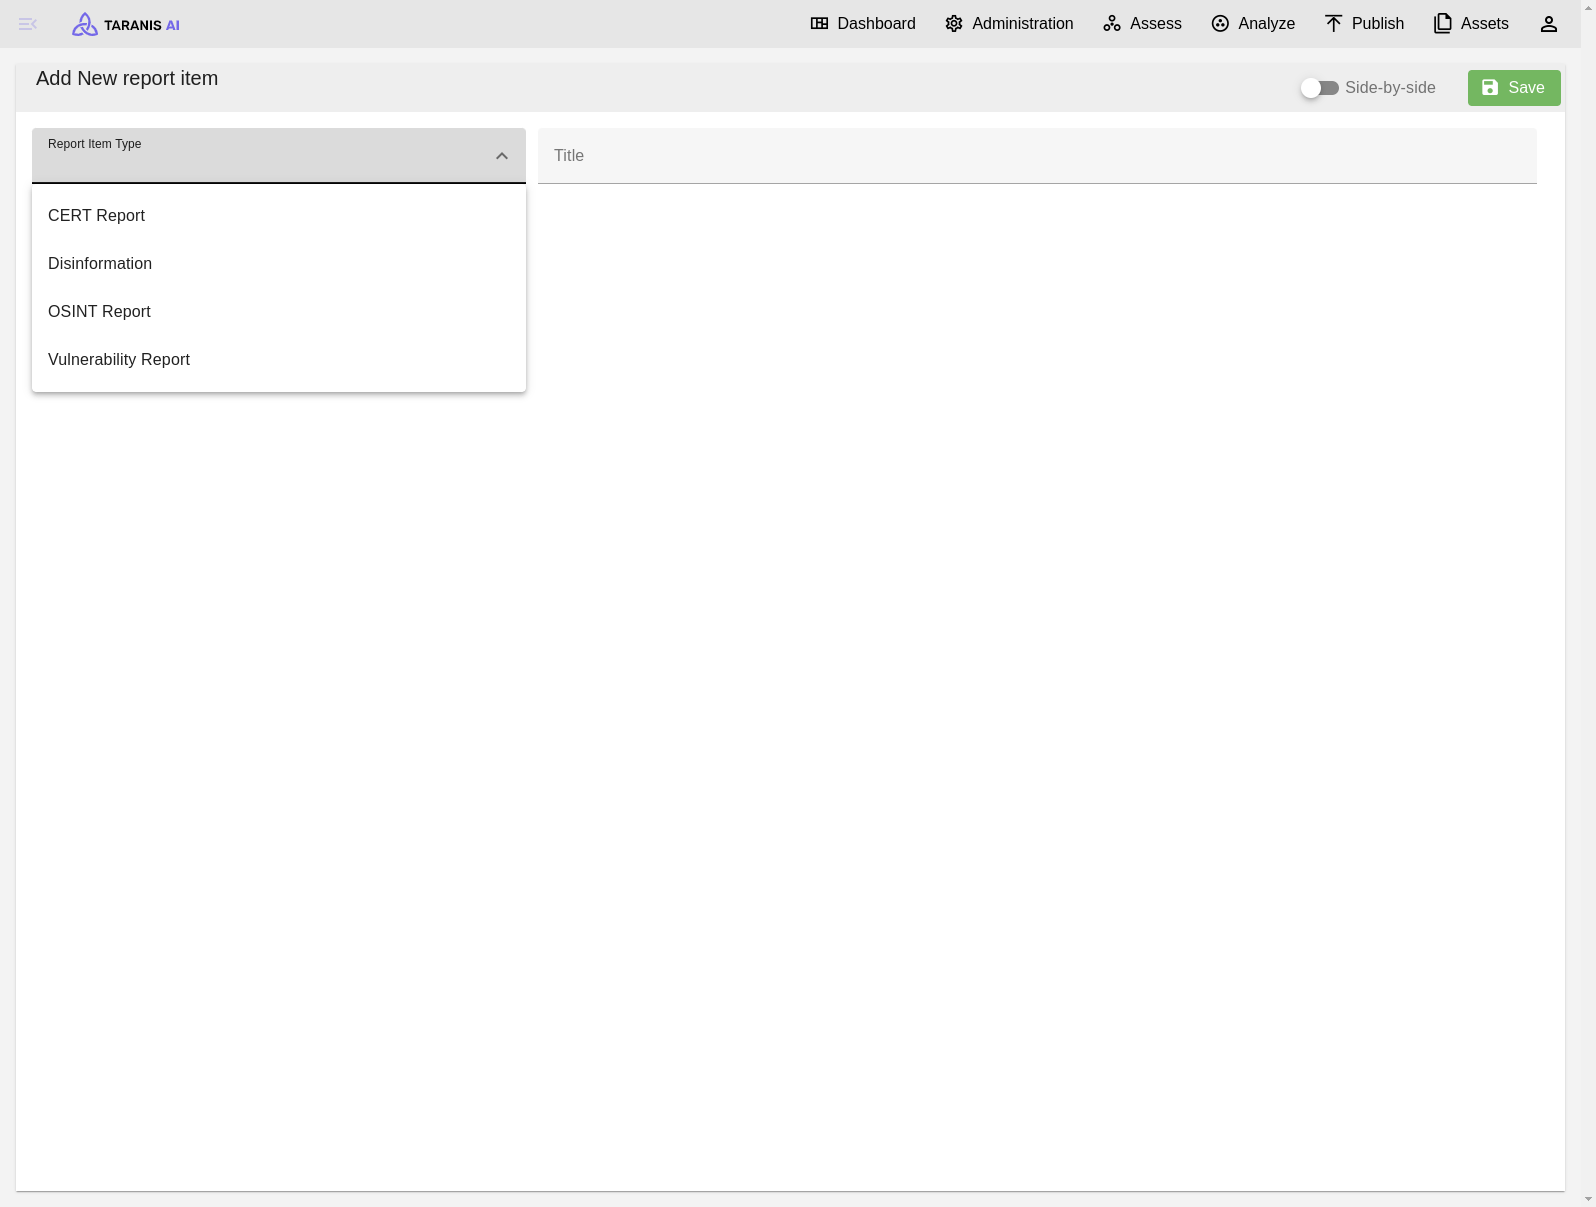
- Create: Reports can be created for any given report type (“New Report” button). After creating a new report, it can instantly be filled with data.
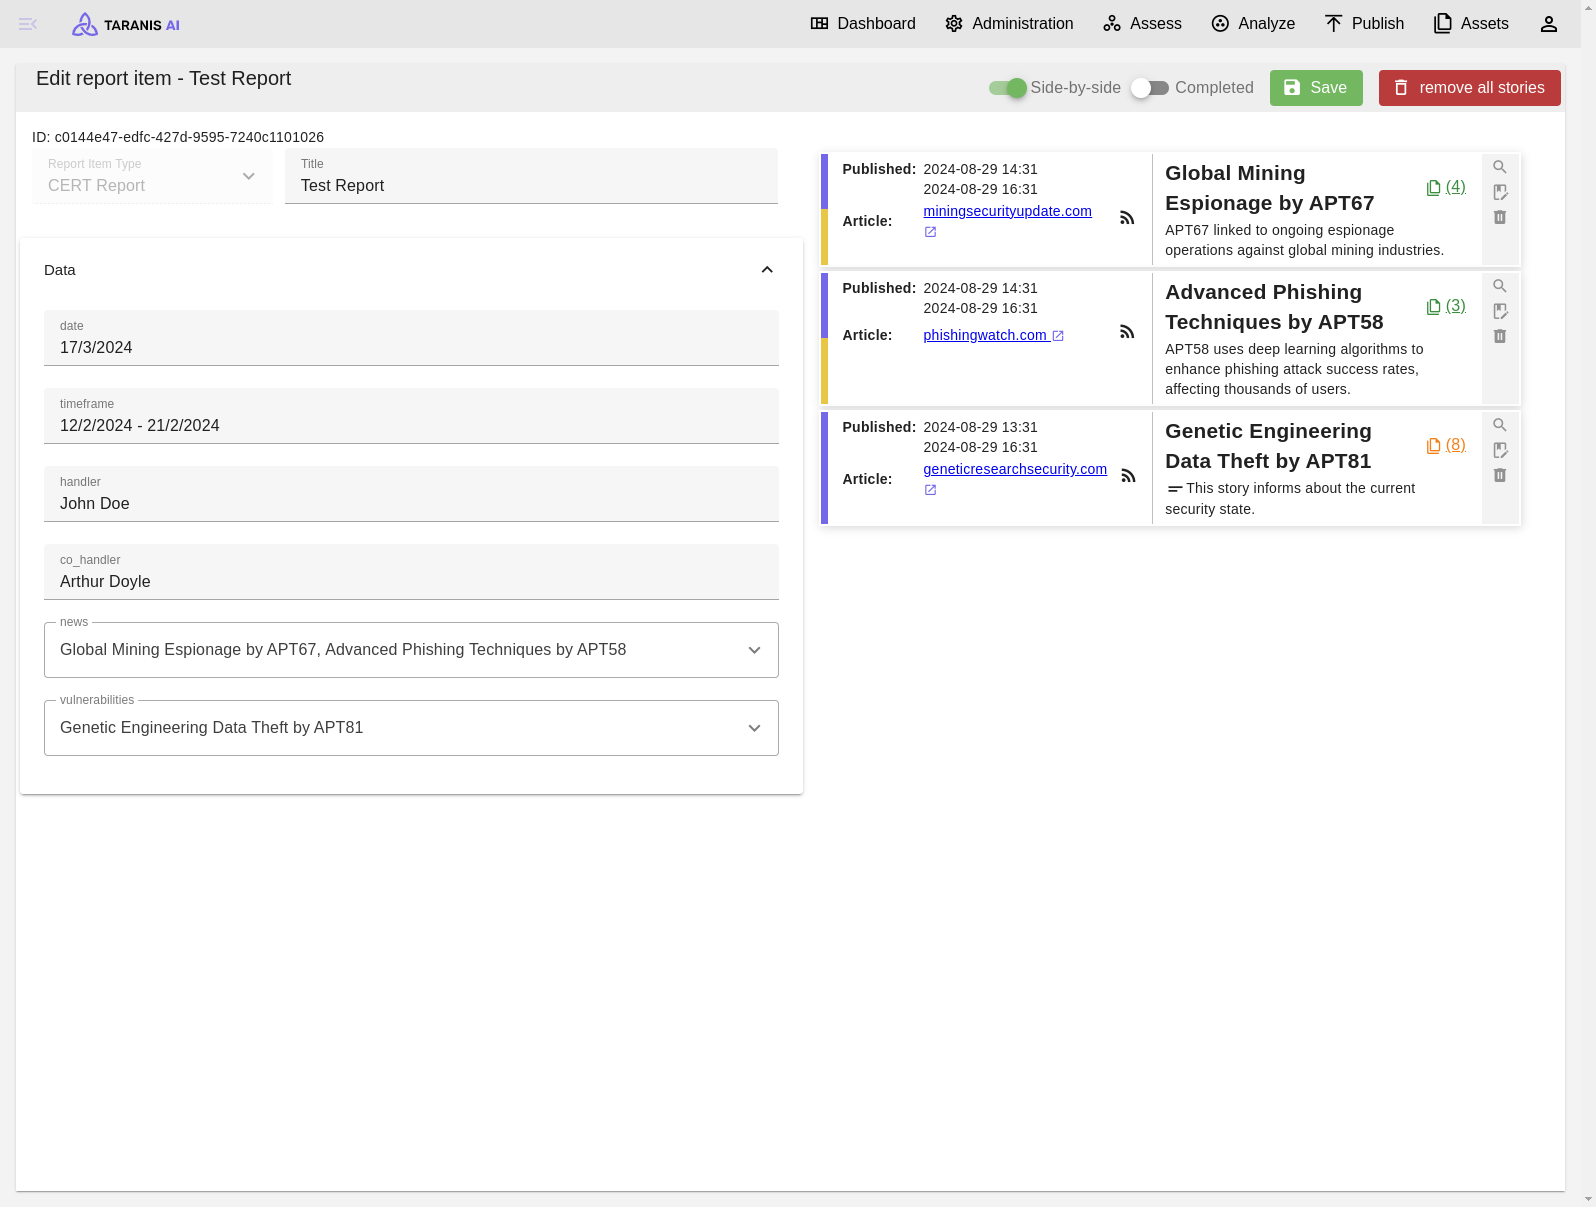
- Read & Update: Details of reports can be edited/read by clicking on them. News items added to reports (assess) are also displayed in the report item view.
- Delete: One or multiple reports can be deleted at once.
Reports can be set to “completed” by changing the switch button in the report edit view (top right).
Filter
- Search: Items can be filtered by string search
- Display: Number of items displayed per page
- Offset: Number that defines first item displayed
- Filter: Filter time range (creation date)
- Completed/Incomplete: Filter by report’s status
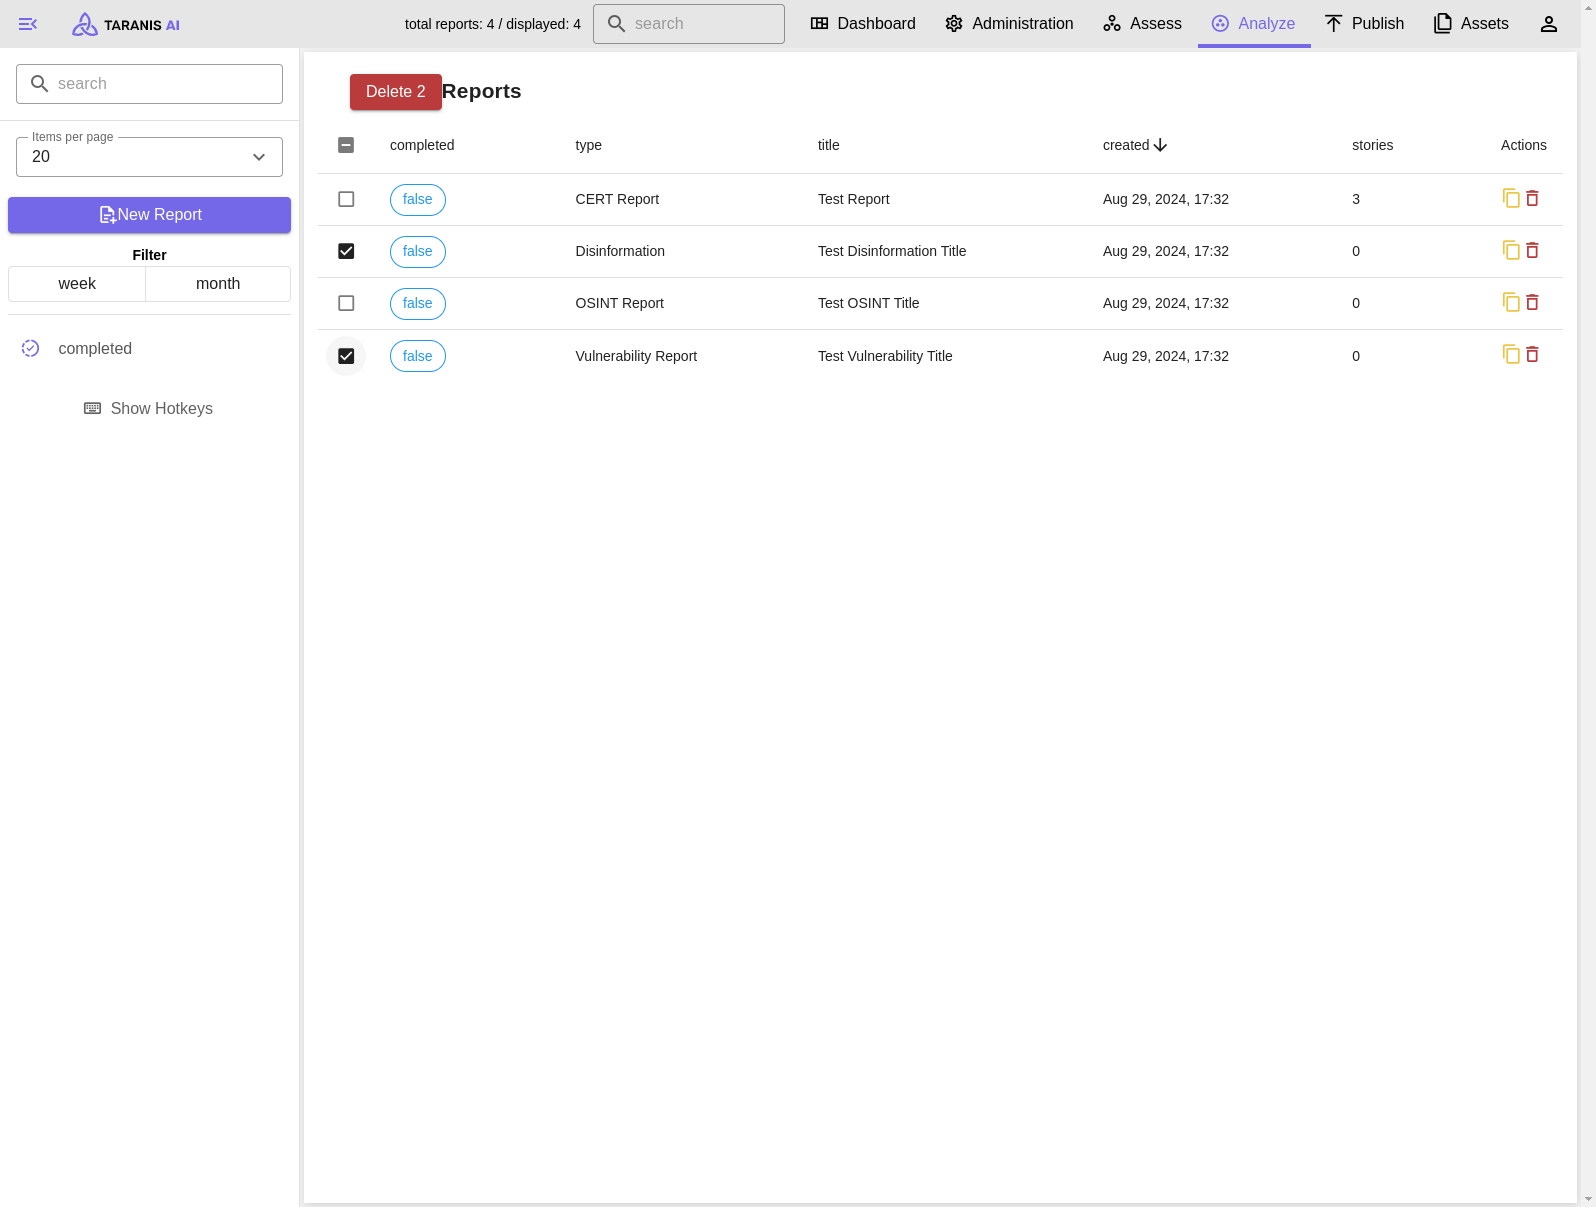
Screenshots
Incomplete reports created today
Add new report item
Deleting multiple reports at once
Report item view
4 - Publish
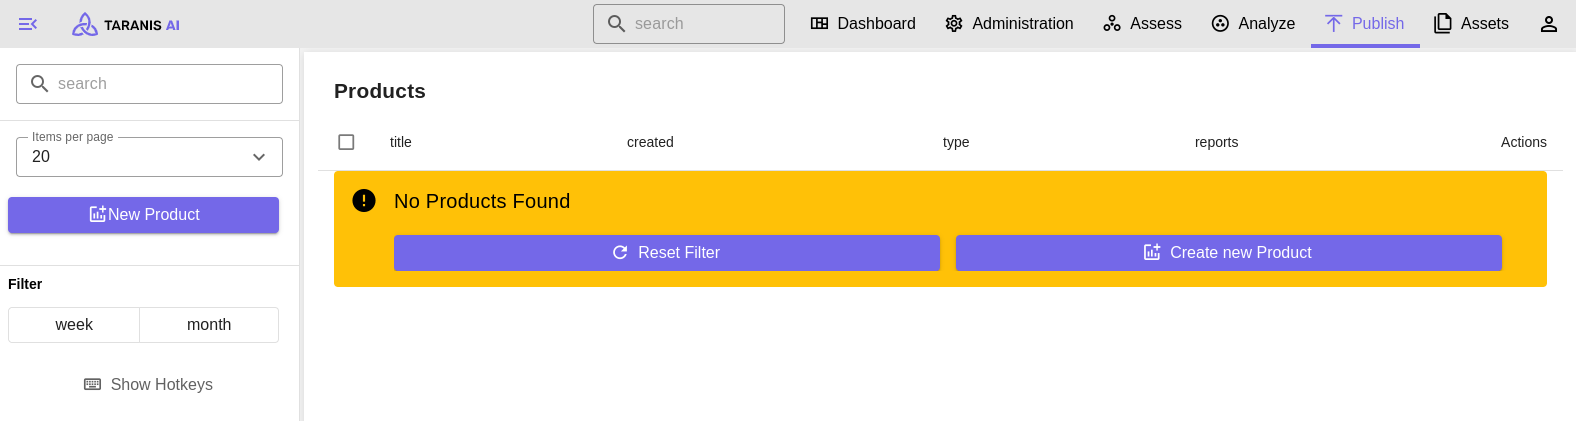
The “Publish” section enables users to manage and display their products. These products allow users to render their reports into various formats such as HTML, JSON, PDF or plain text.
Functionalities
Description of options of the left-hand side panel.
Filter
- Search: Items can be filtered by string search
- Items per page: Number of items displayed per page
- Filter: Show items created today, this week, or this month
Screenshot
See also Product Types_
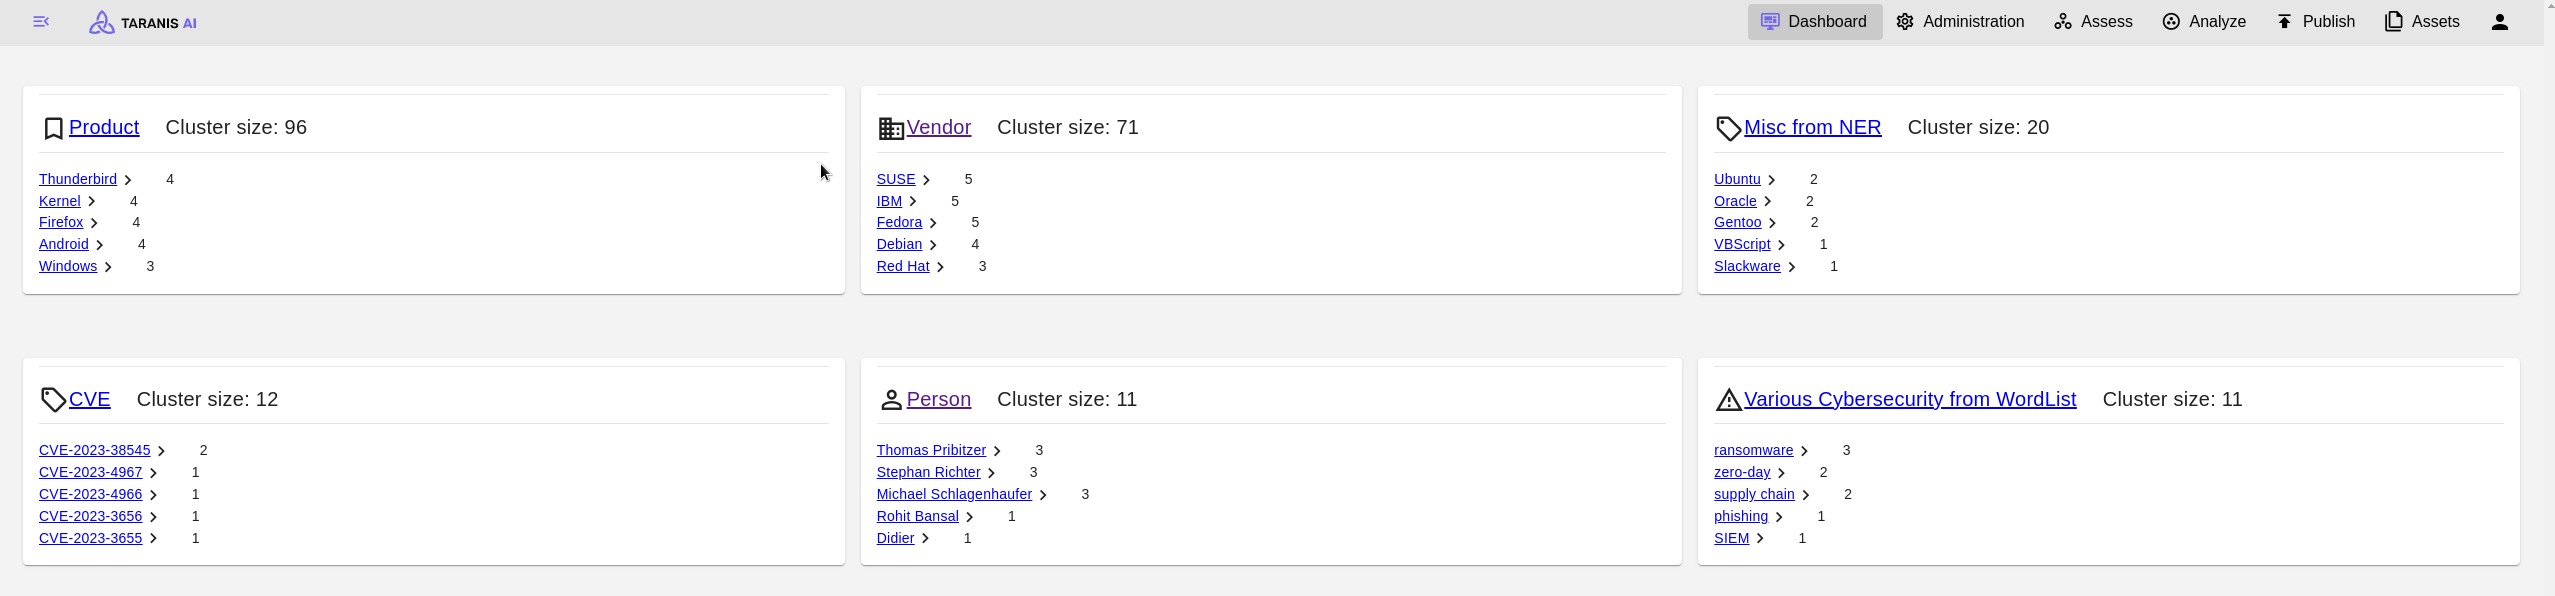
5 - Dashboard
Homepage after logging into Taranis AI
Dashboard is displaying the most frequent topics as well as basic statistics of the application. By clicking on one of the topic headers, the user gets redirected to the Assess endpoint (with the topic set as tag filter). The statistic fields redirect to the respective endpoints, too.
6 - User settings
Any user has the ability to change various settings and can log in/out from the application.
User details
Username and user’s organization are displayed.
Change user settings
- Dark theme: Change to dark theme
- Language: Switch language (English, German, Slovak)
- Spellcheck: Enable/disable spellcheck
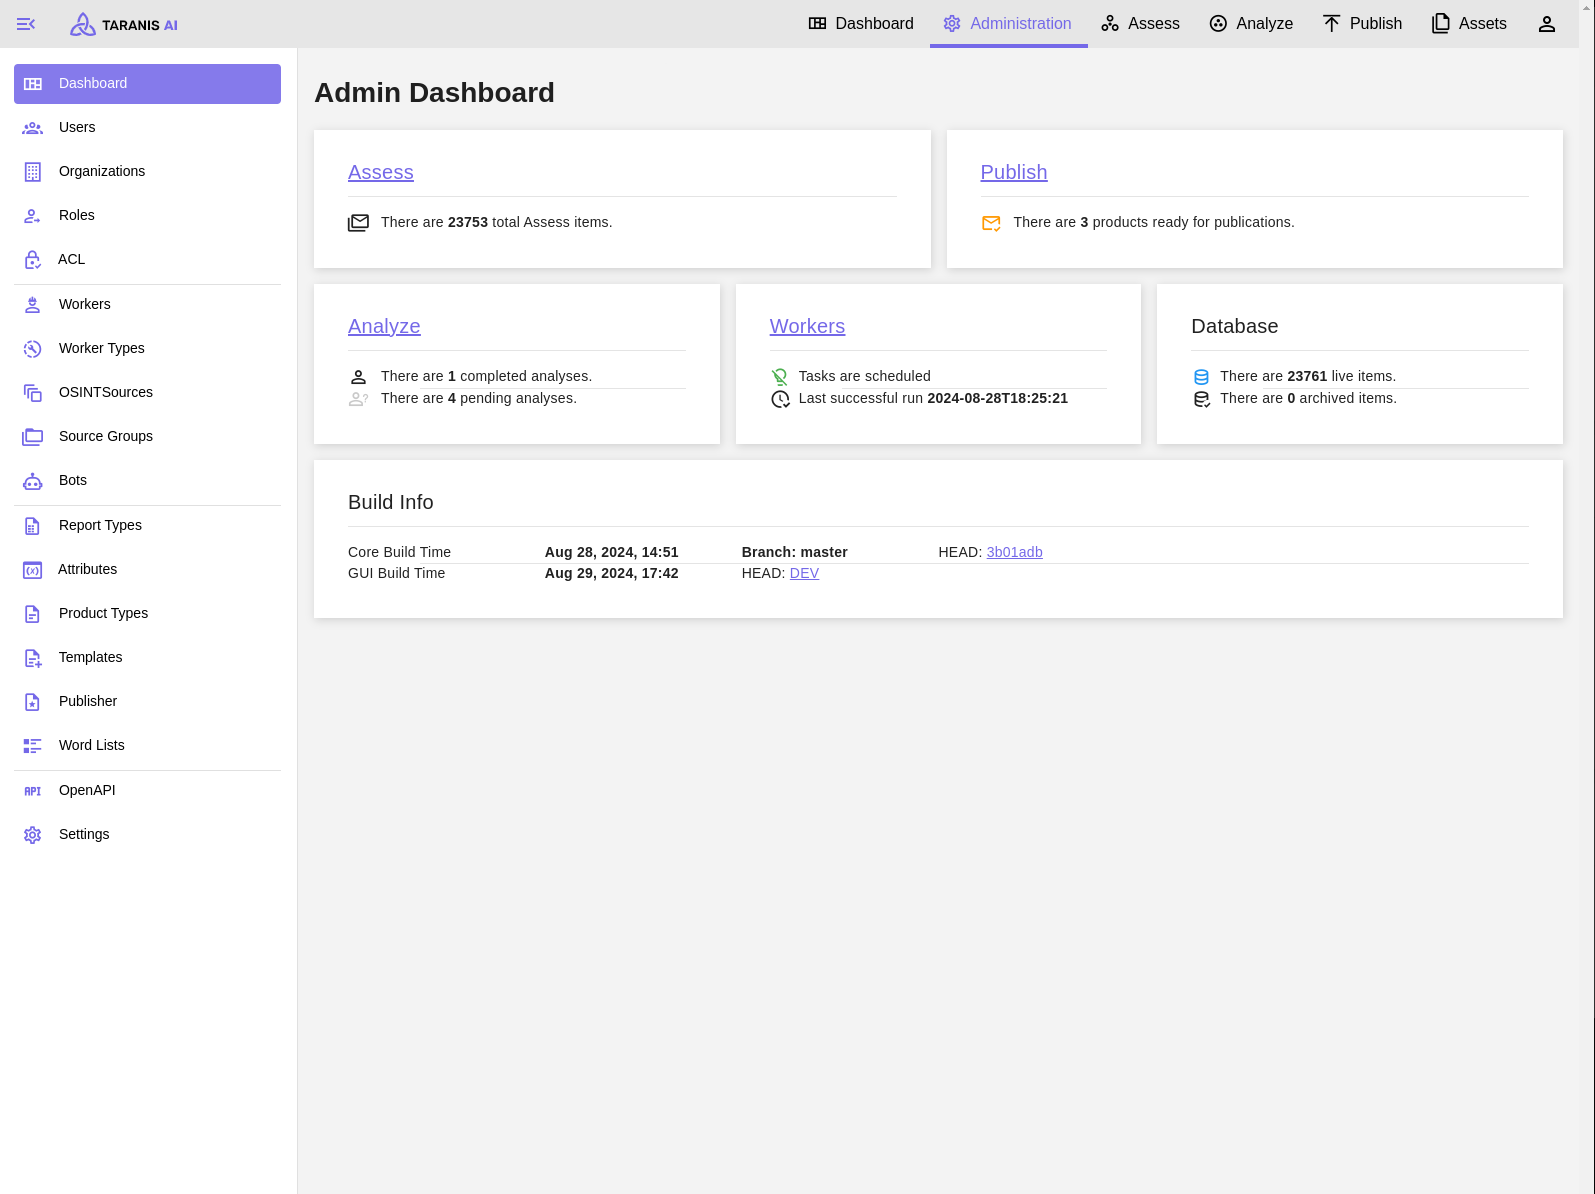
7 - Administration
Administration section and general workflow
These options are accessible only via users with respective administration privileges. (See User management)
Screenshots
Administration dashboard showing statistics and all its functionalities (sidebar)
7.1 - User Management
Users, Organizations and Roles can be managed by admin users in the Administration tab.
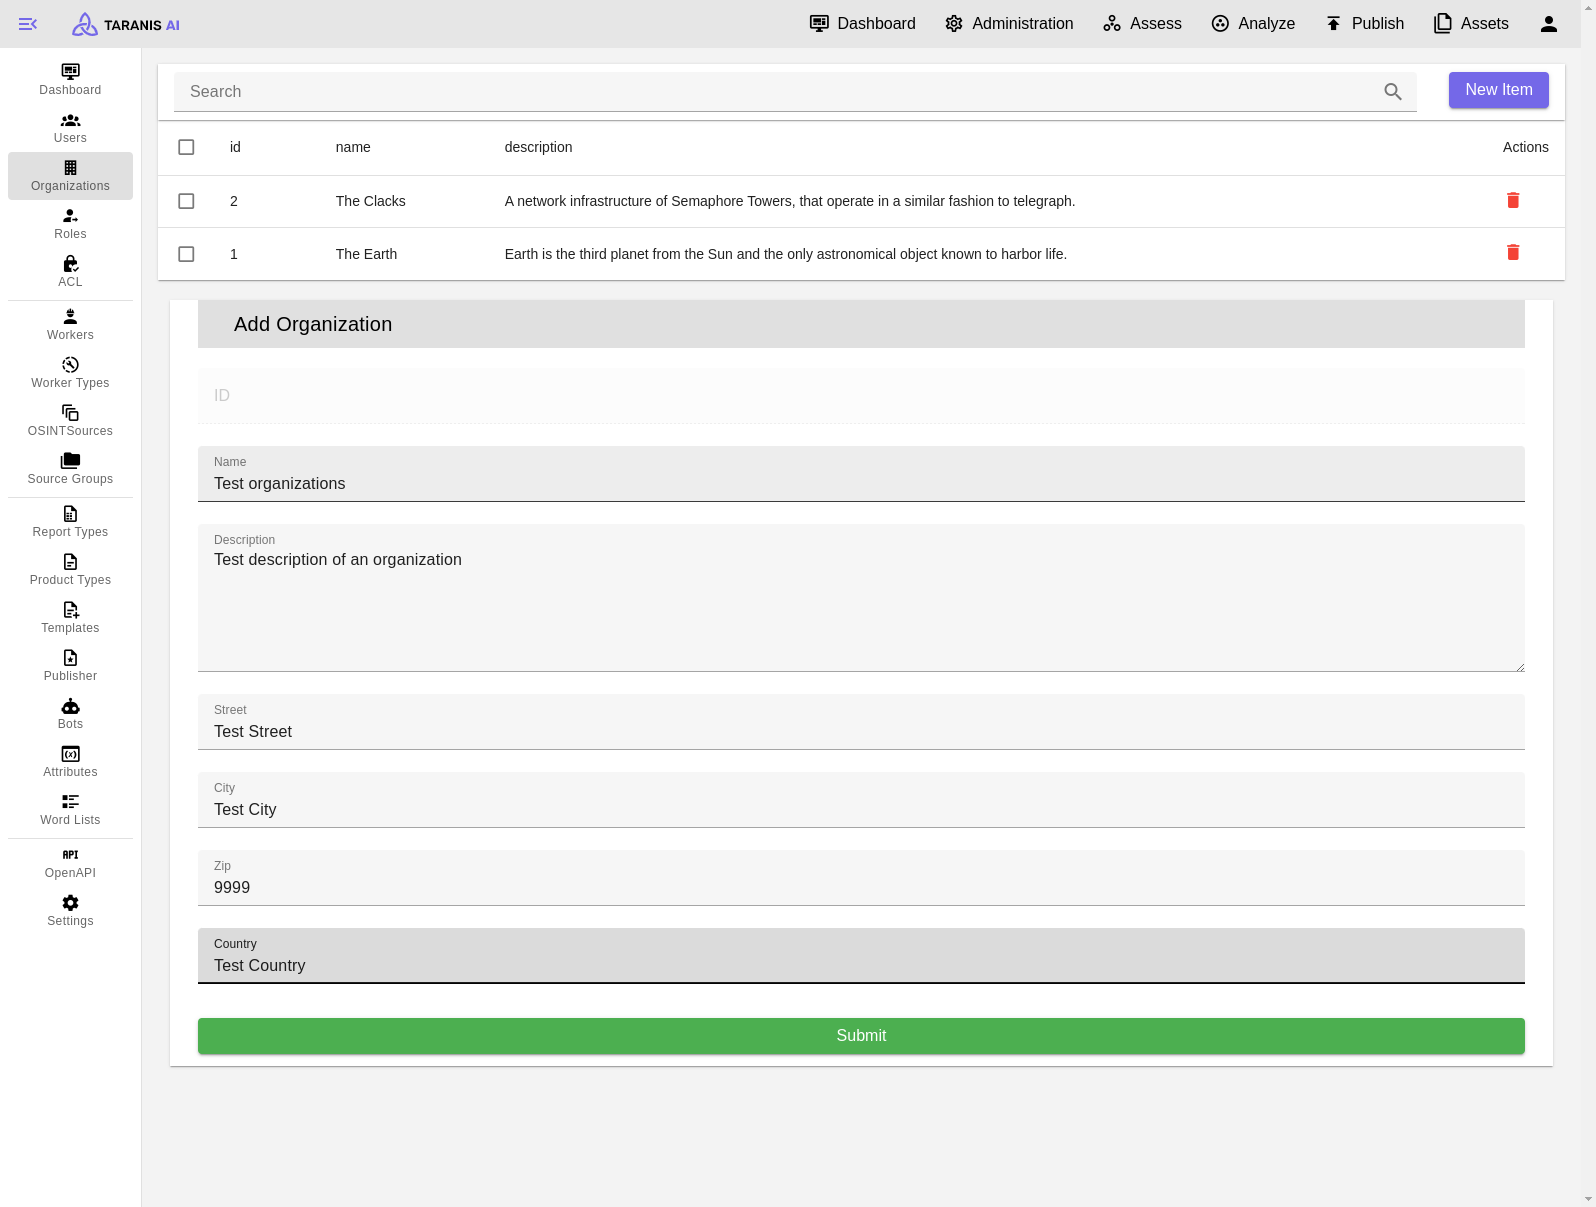
Organizations
Organizations can be added with following parameters defining them: name, description, address.
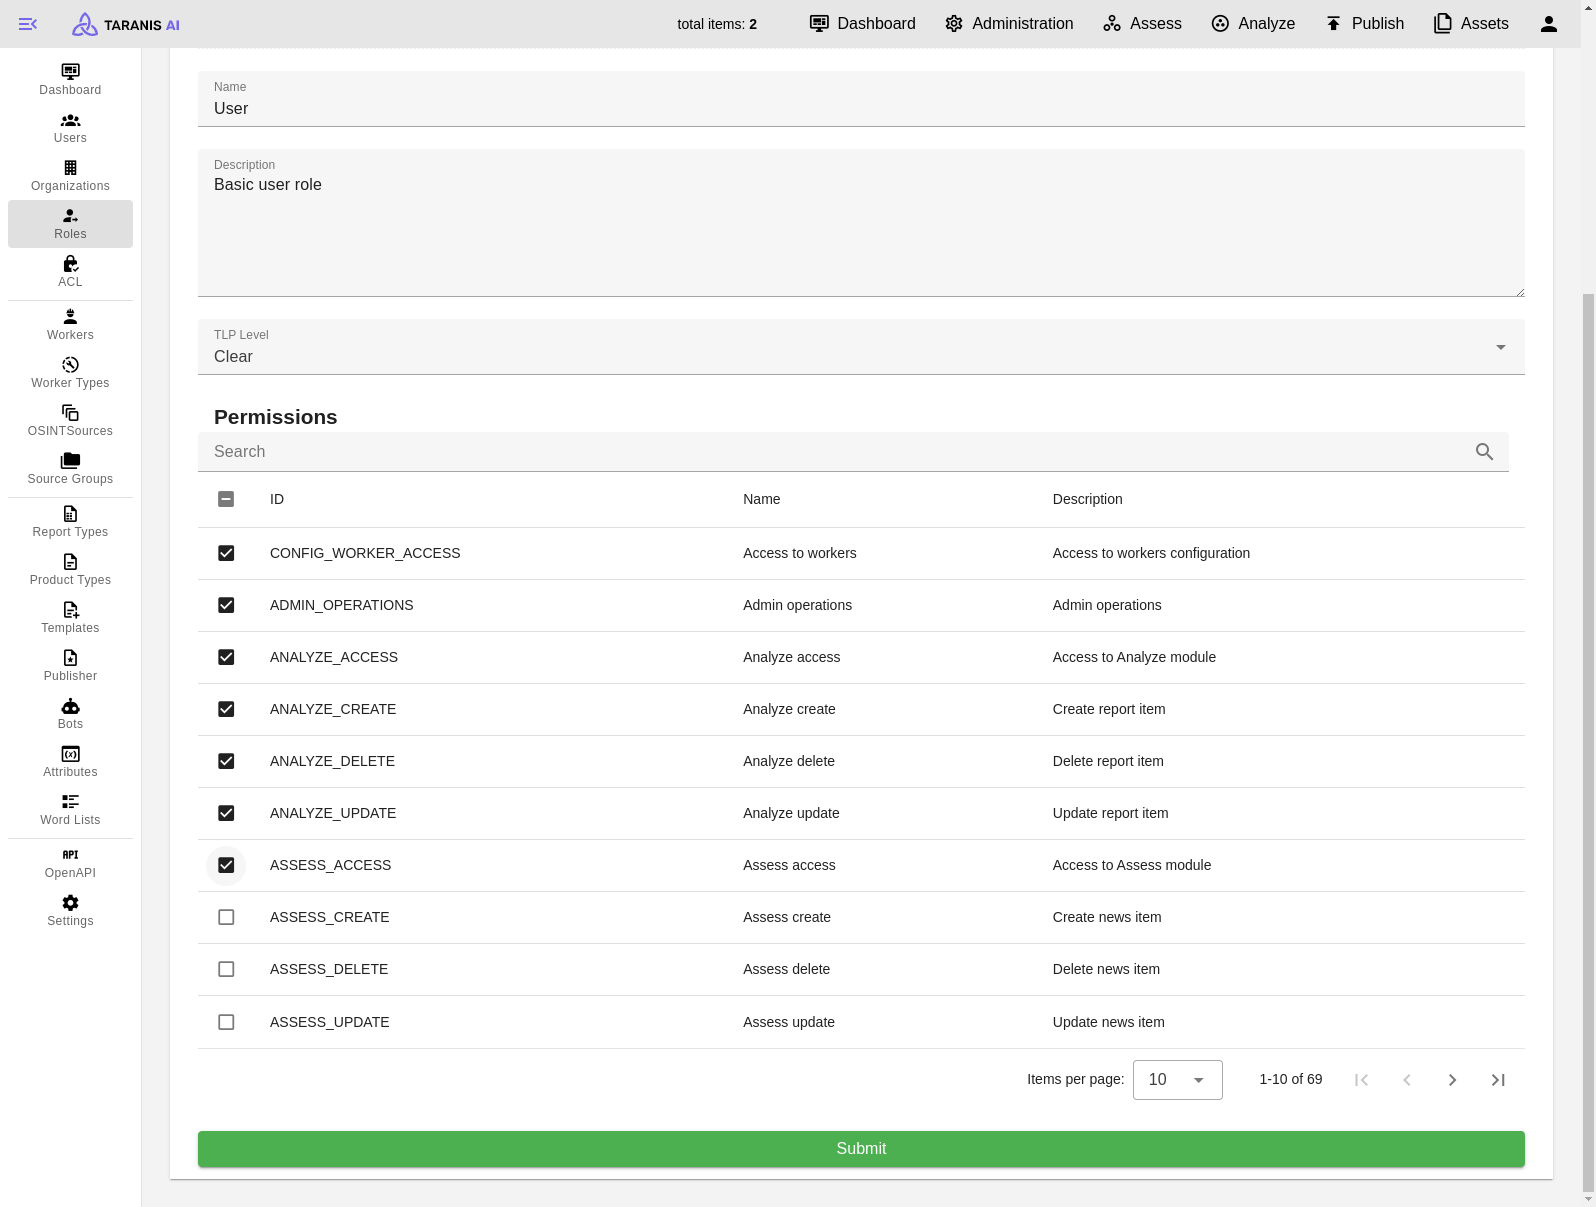
Roles
Define roles with certain permissions.
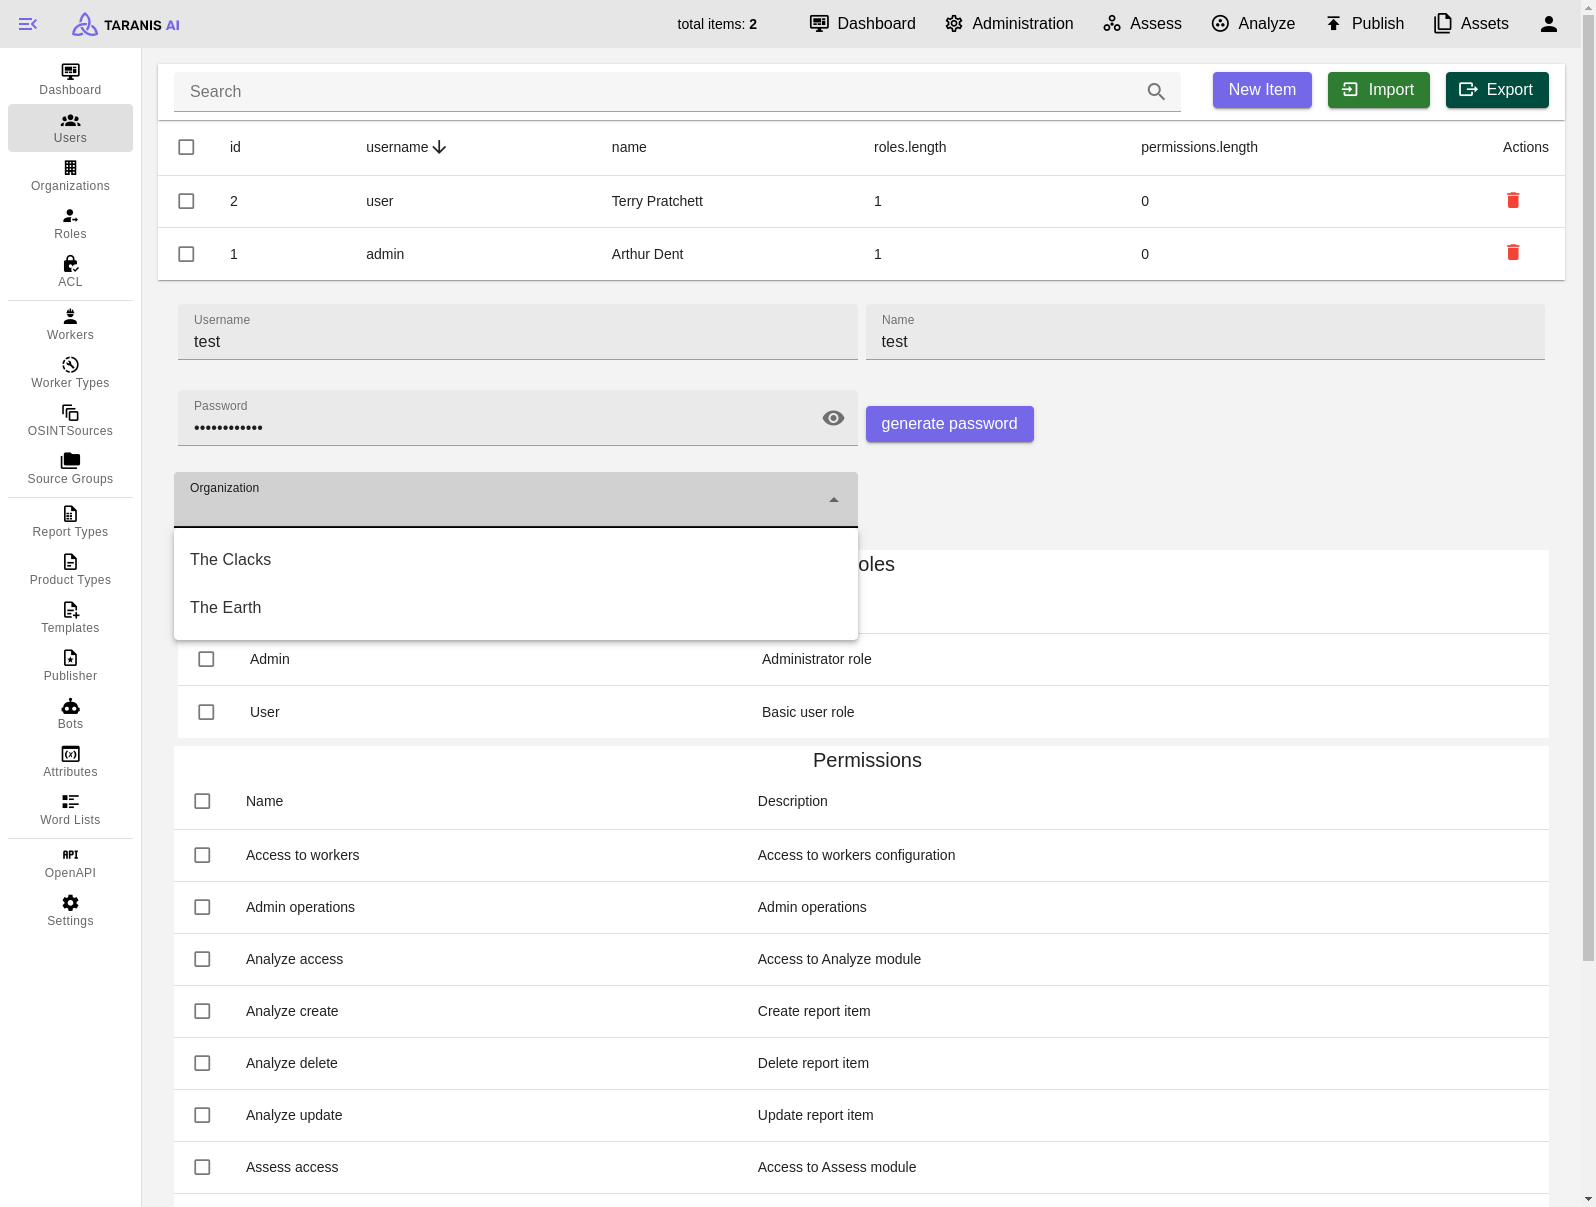
Users
Manage users and assign them a role, permissions and an organization.
Screenshots
Add new Organization
Edit basic user role
Add new User
7.2 - OSINT workflow
General usage of Taranis AI
Functionalities
- Create OSINT Sources
- Add word lists
- Adapt word list’s functionality
- Enable include/exclude list filtering
- Bot selection
- Collect Sources
1. Create OSINT Sources
- Import/Export: Sources can be imported and exported as JSON
- CRUD: Sources can be created, updated and deleted. For each source a collector, feed URL and the content location can be defined among other things.
To get started there is list of RSS sources we worked with: Initial setup_
2. Add word lists
- Import/Export: Word lists can be imported and exported as json
- CRUD: Word lists can be created, updated and deleted.
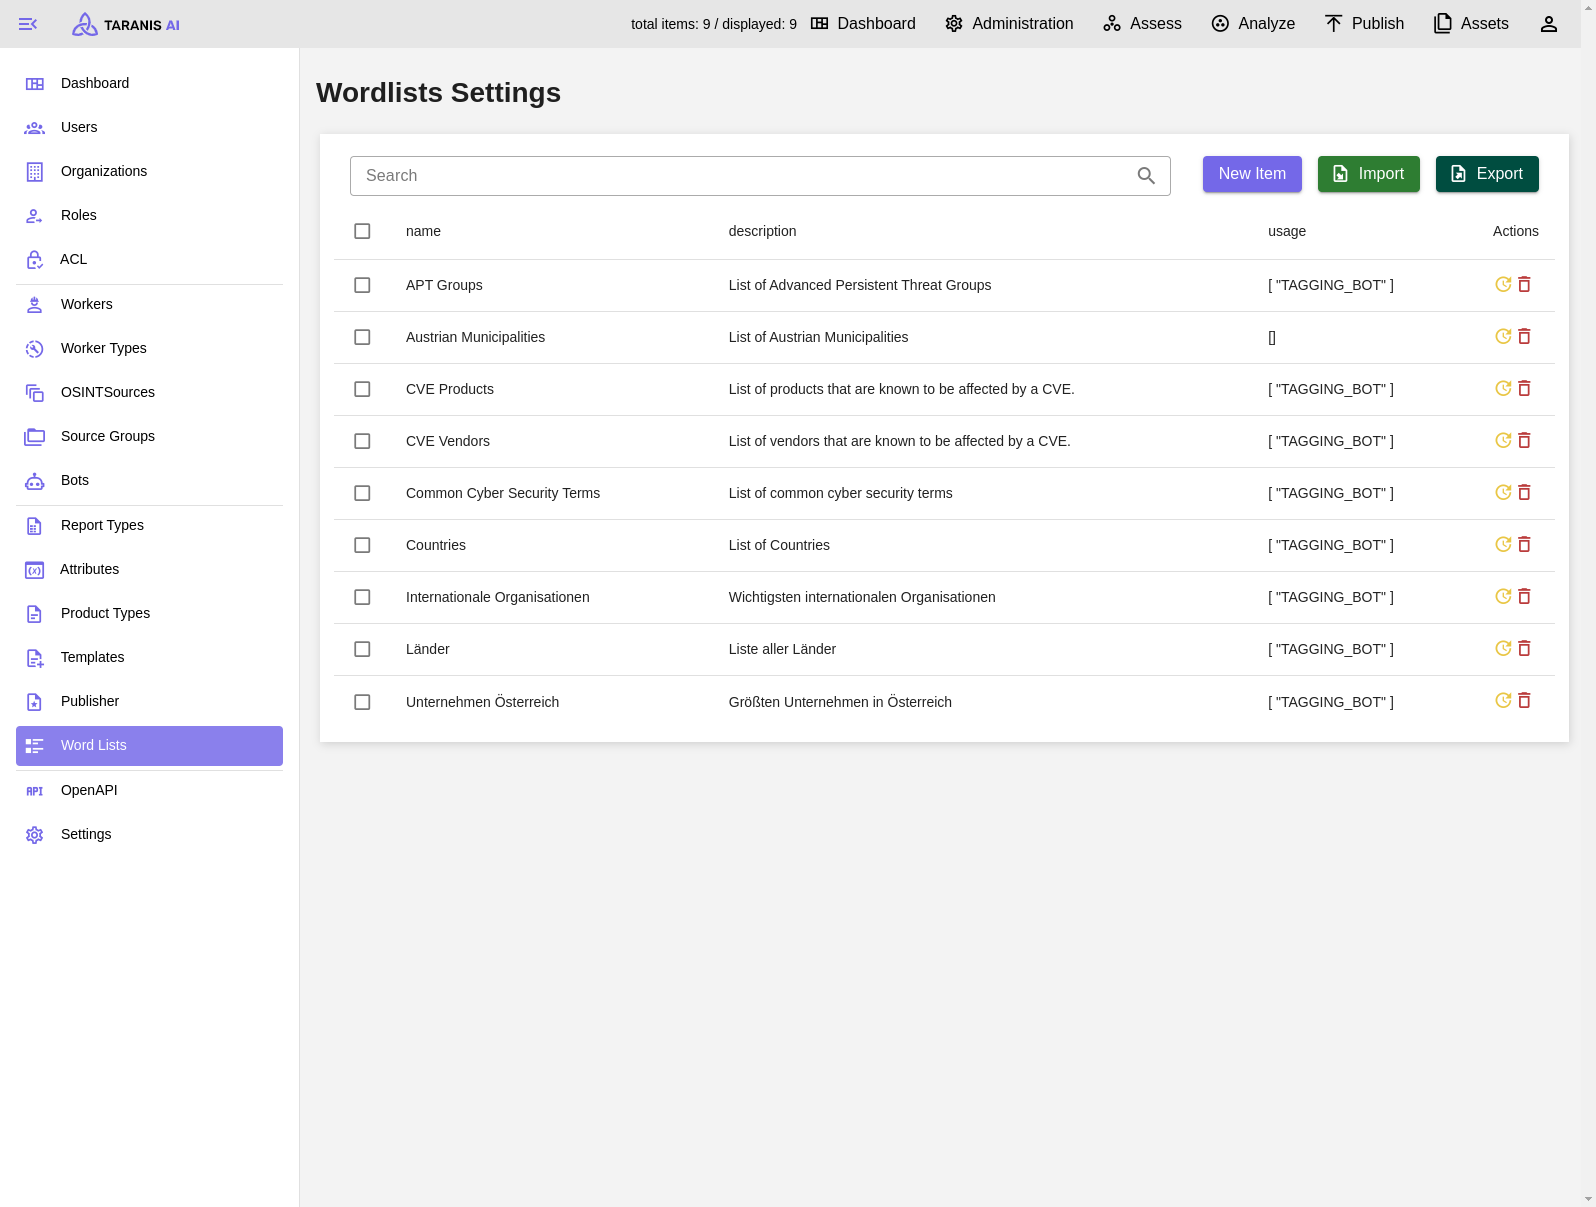
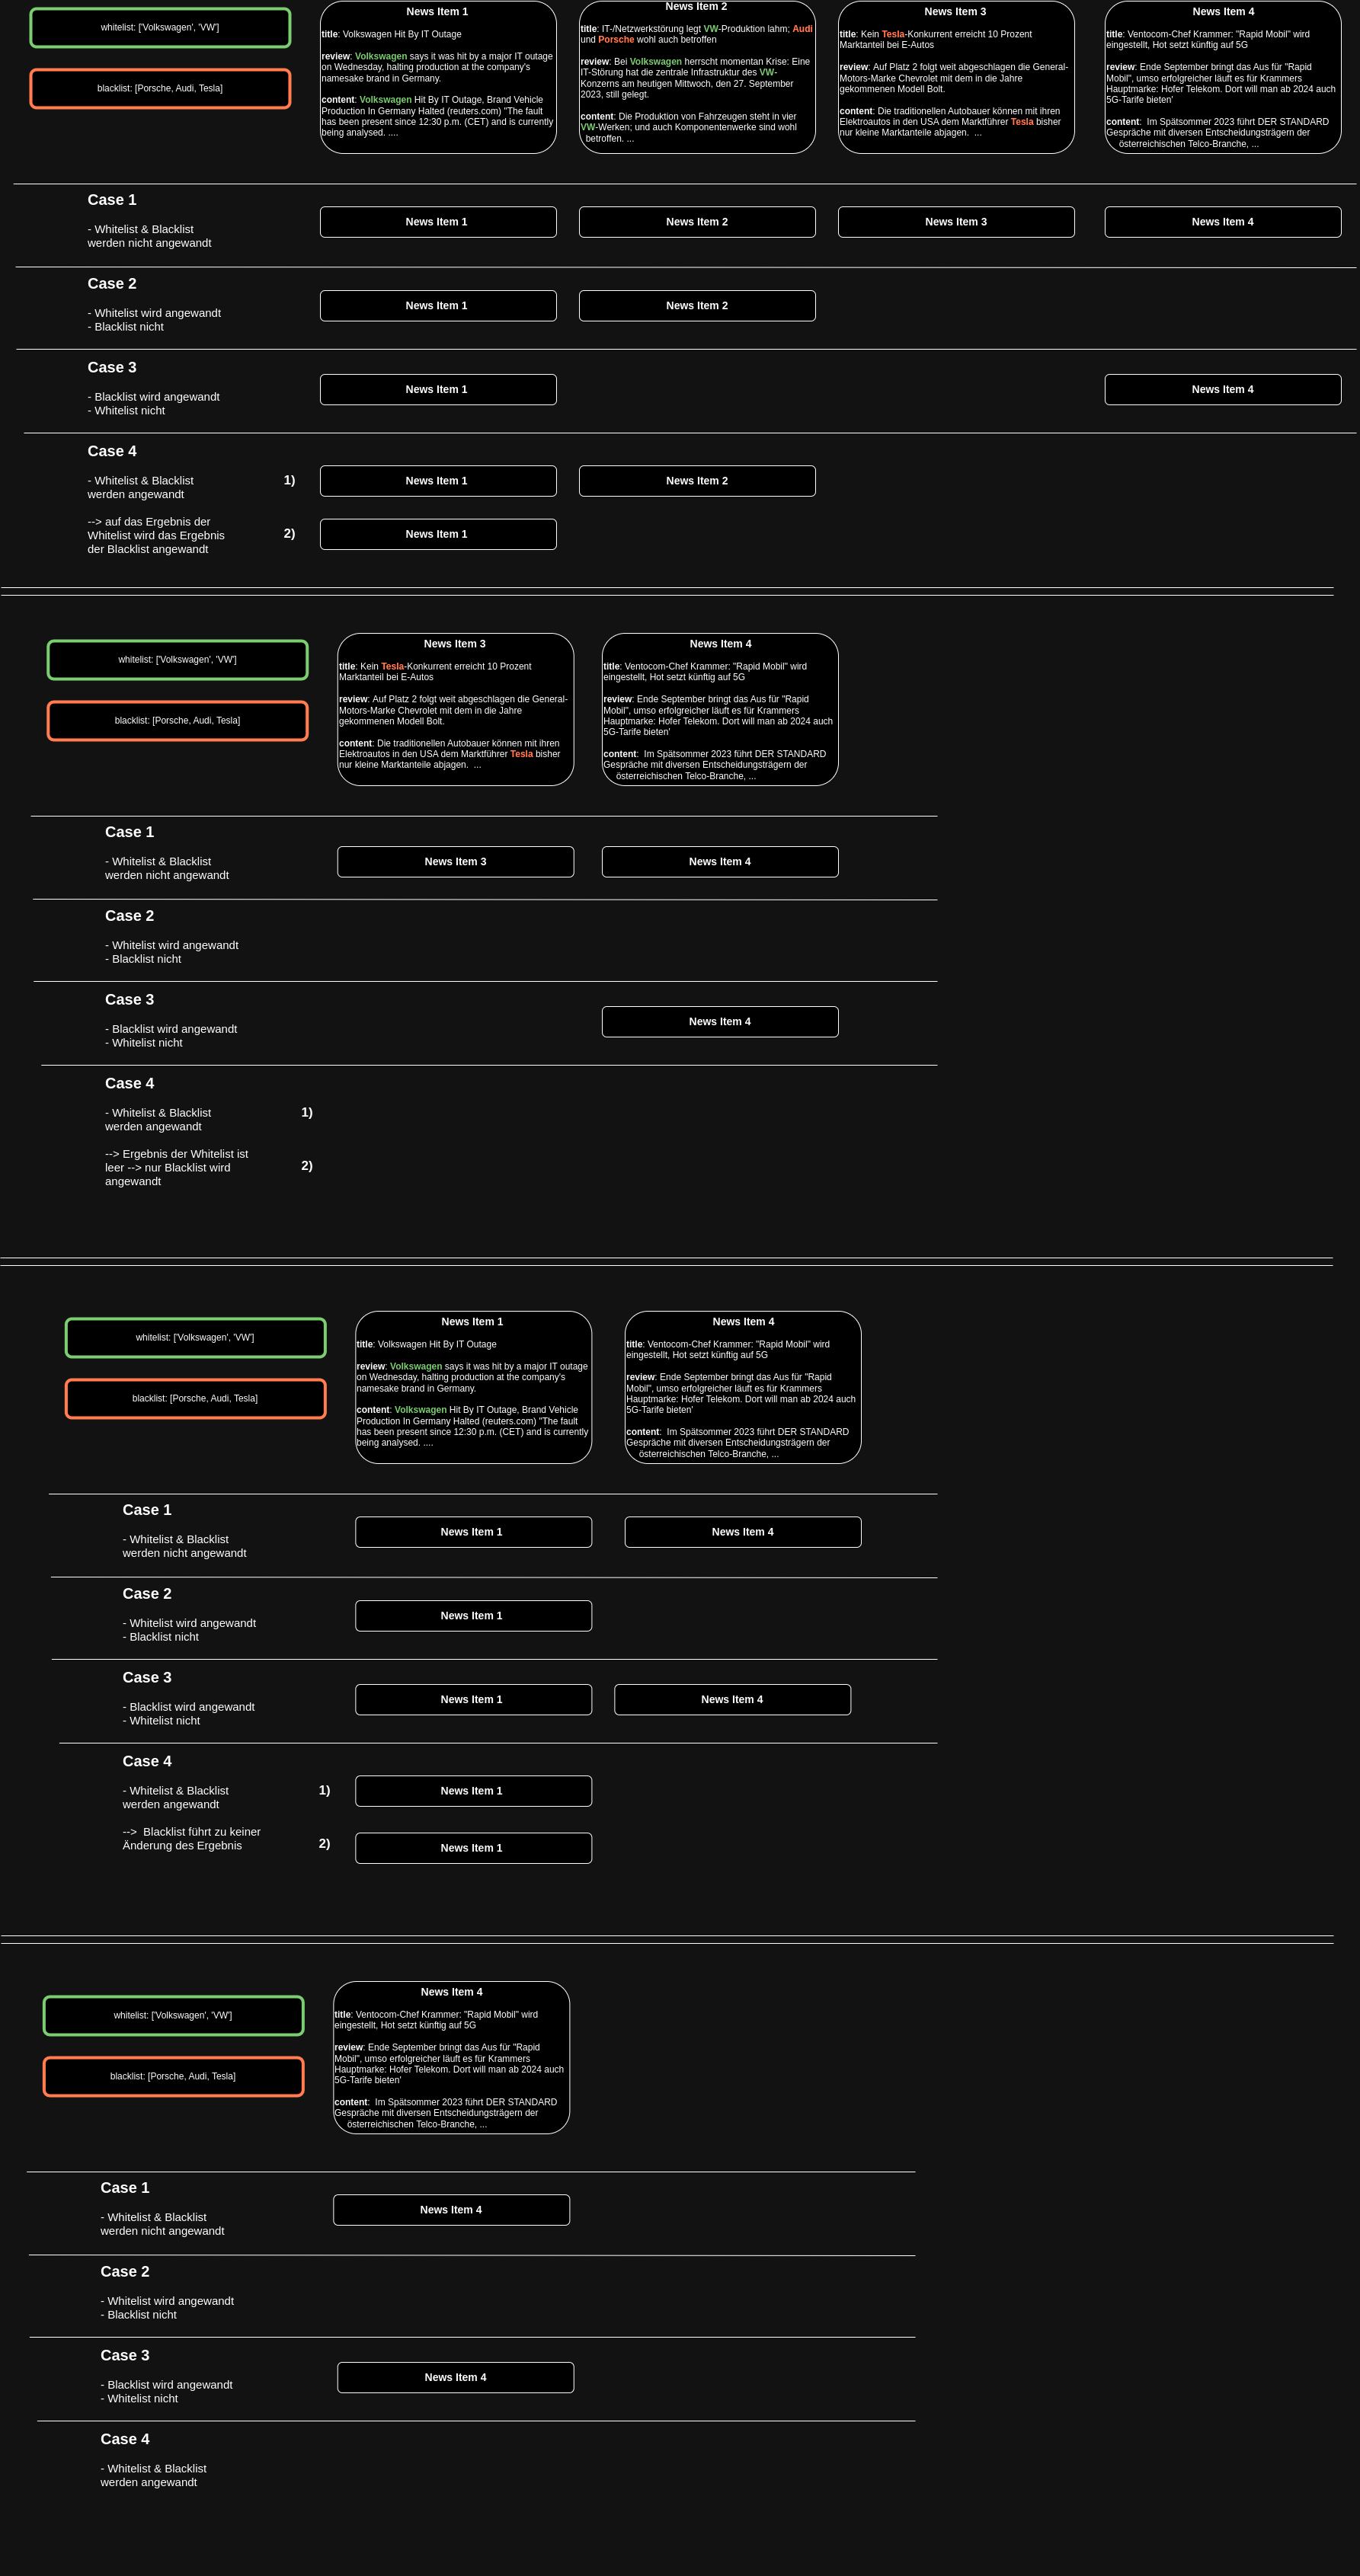
3. Adapt word list’s functionality
Word lists can have the following functionalities (displayed under “usage”):
- Collector Includelist: Collected news items using words of this word list will be accepted
- Collector Excludelist: Collected news items using words of this word list will not be accepted
- Tagging Bot: Collected news items will be tagged with words from these word lists
- Collector Includelist & Tagging Bot: A word list can be used for tagging and include listing
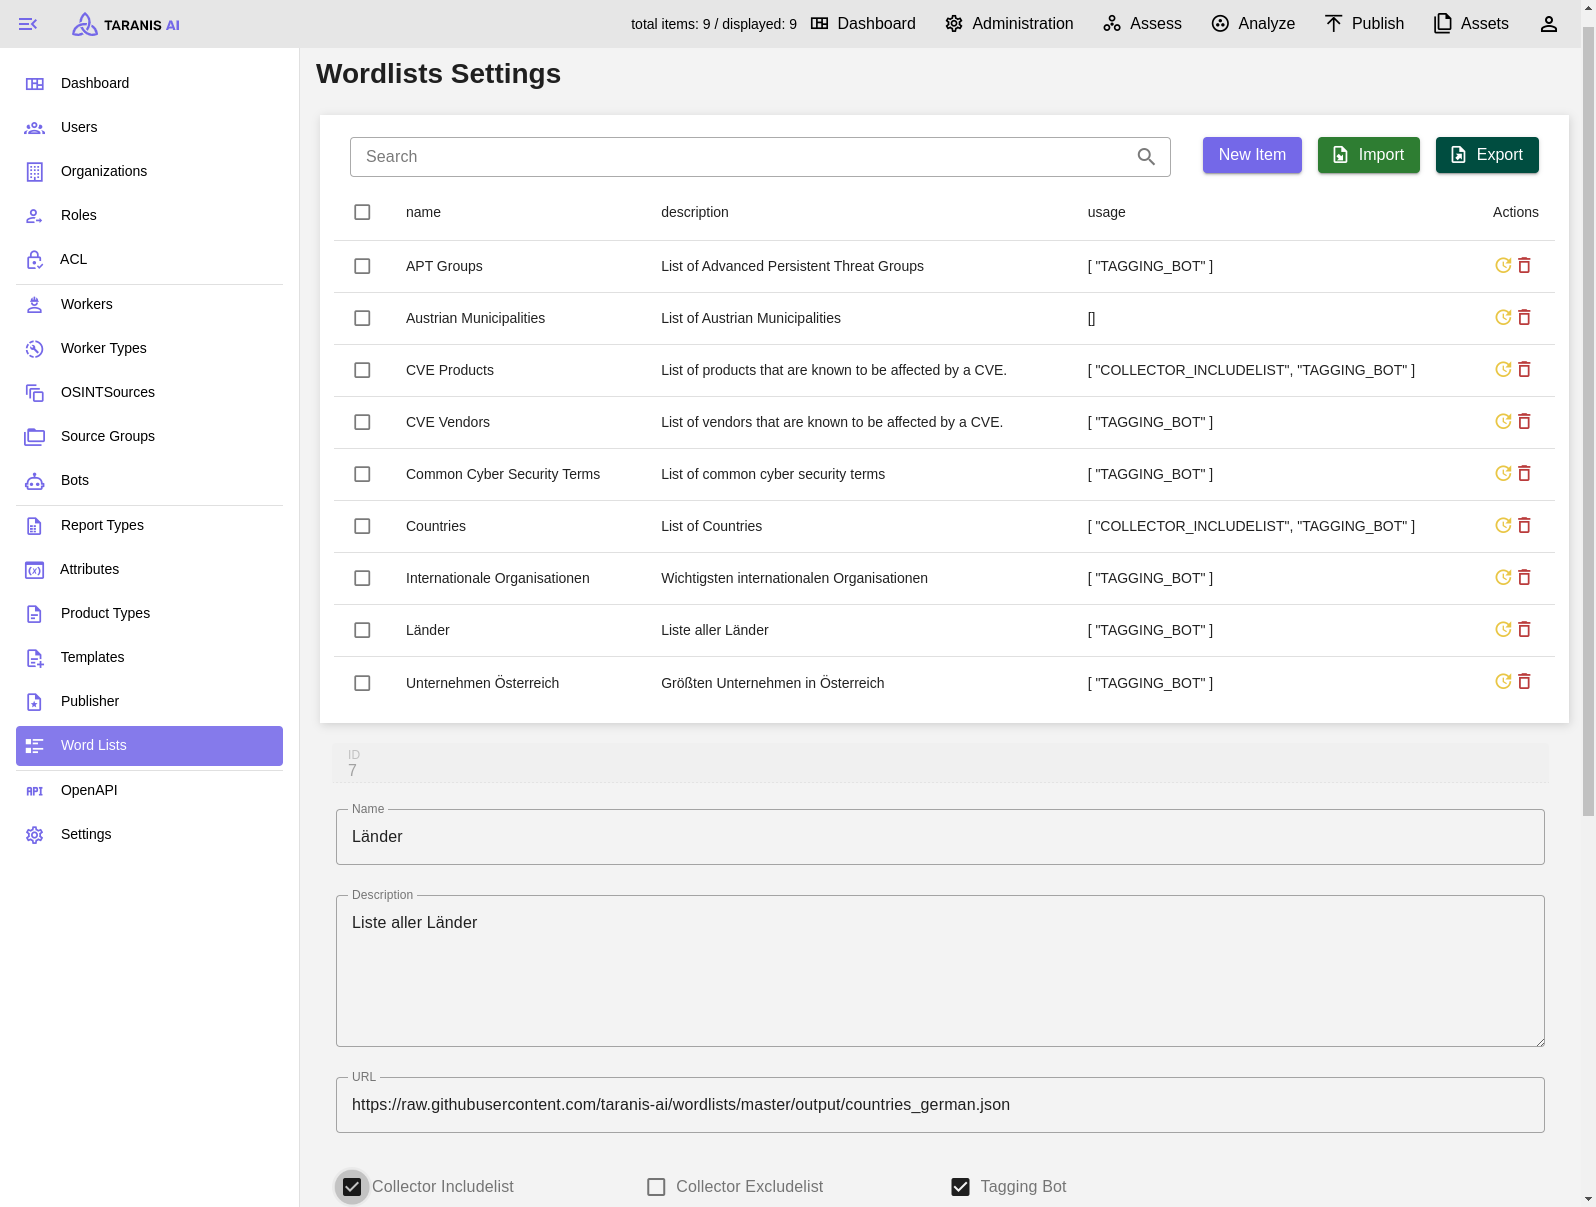
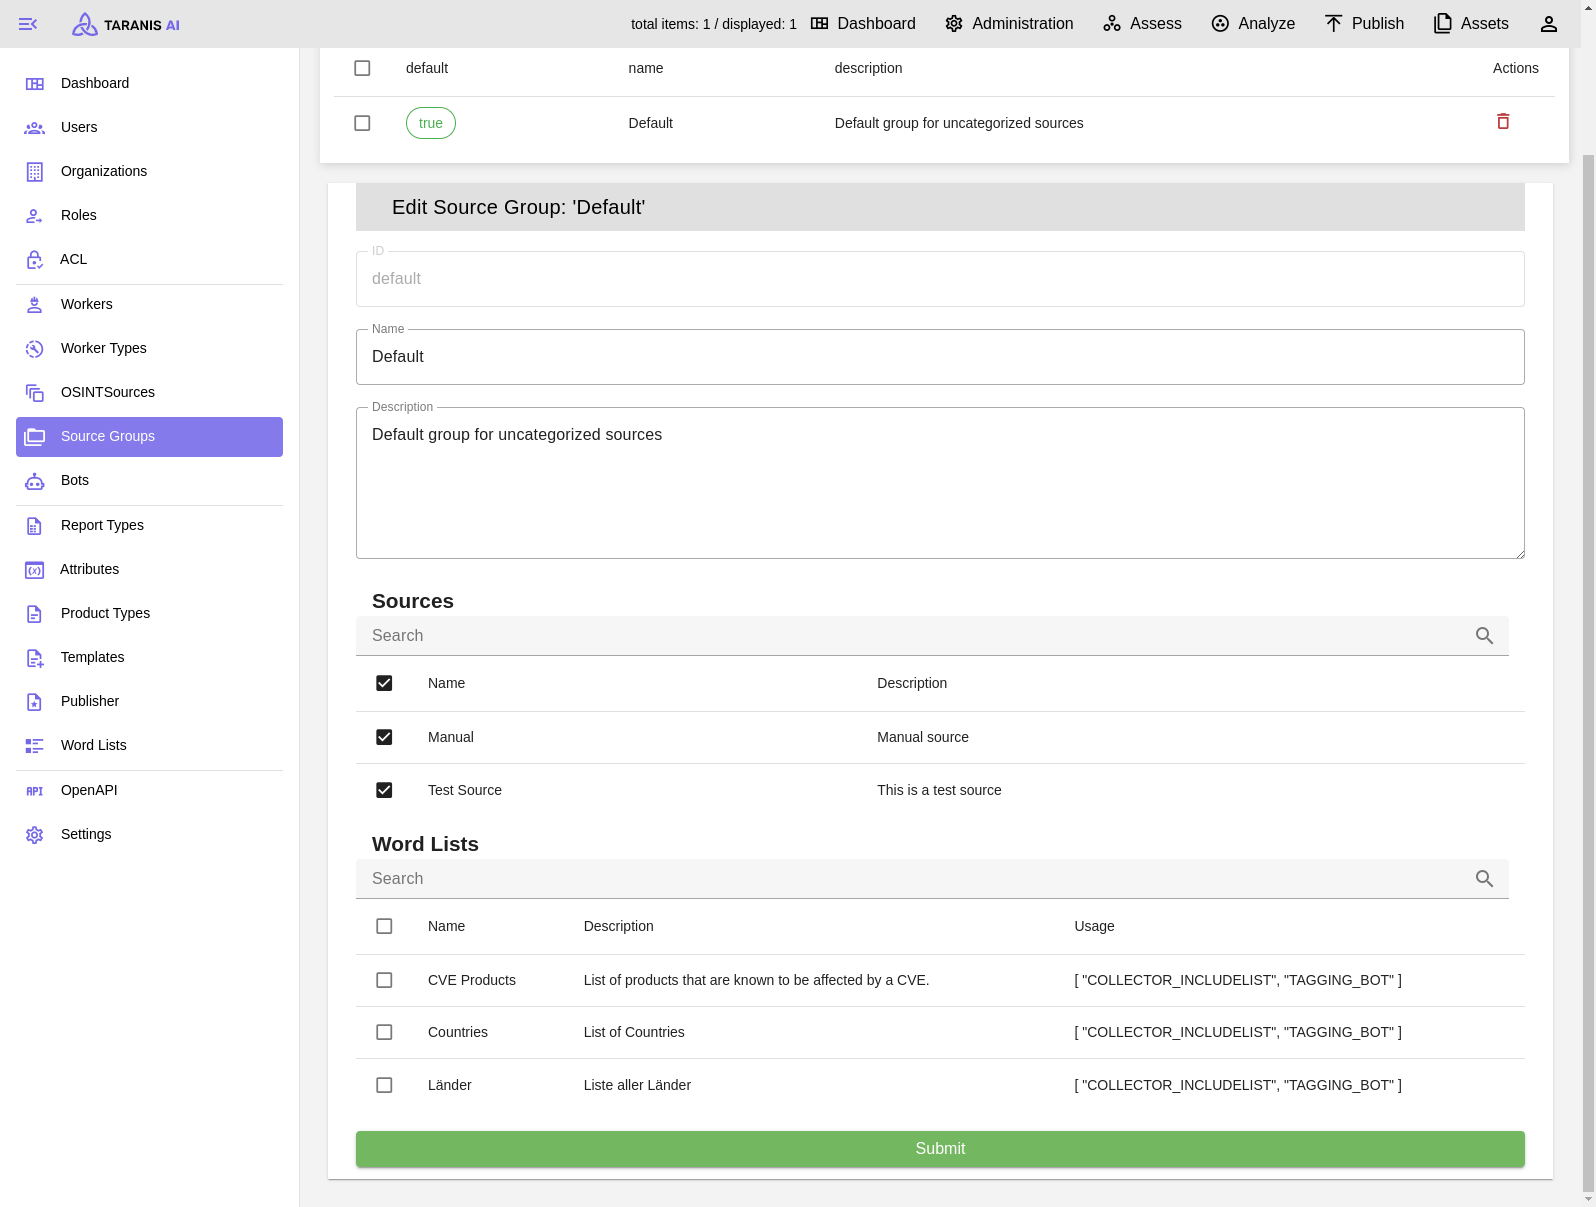
4. Enable include/exclude list filtering
To activate include or exclude lists, they need to be added to the default source group.
It has to be mentioned, that this include/exclude filtering happens during the news item collection. Therefore, only filtered news items will be stored in the database and displayed in “Assess”.
5. Bot selection
After the collection, it is possible to adapt news items.
Therefore, following bots are currently available:
- Wordlist bot: Tags news items by wordlist
- IOC bot: Finds indicators of compromise in news items
- NLP tagging bot: Tags news items via NLP
- Story bot: Applies story clustering to news items
- Summary bot: Summarizes stories
CRUD: Bots can be created, updated and deleted.
Index: Decides the order of bots
RUN_AFTER_COLLECTOR: Indicates if bot is active after collection
6. Collect Sources
After all settings are made, sources can be collected. Either collect all sources by clicking on the “collect sources” button, or collect single sources.
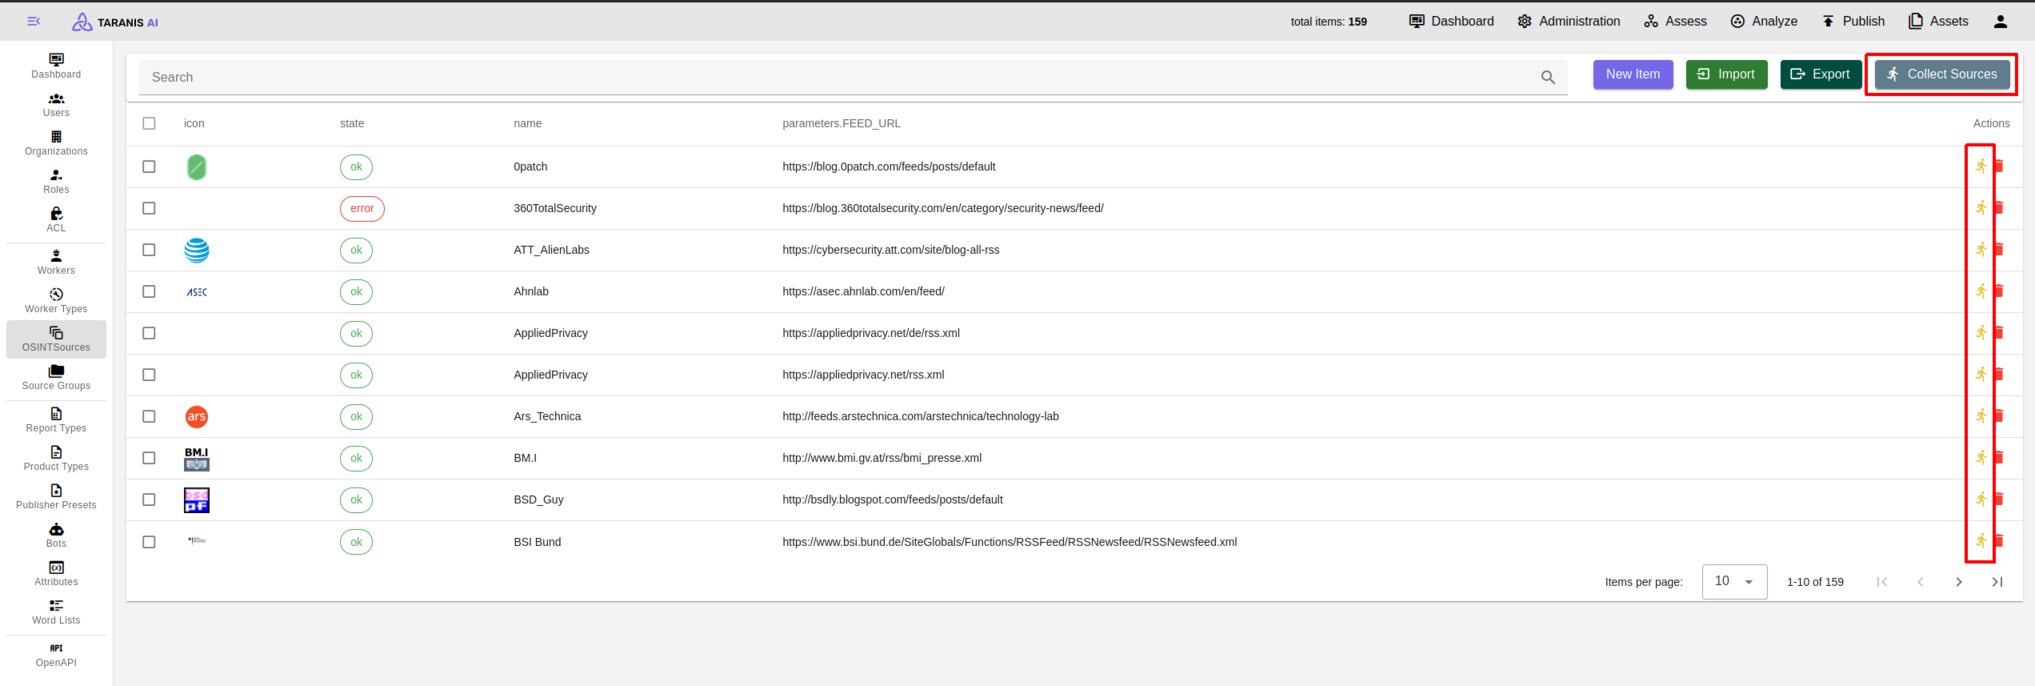
7.3 - OSINTSources
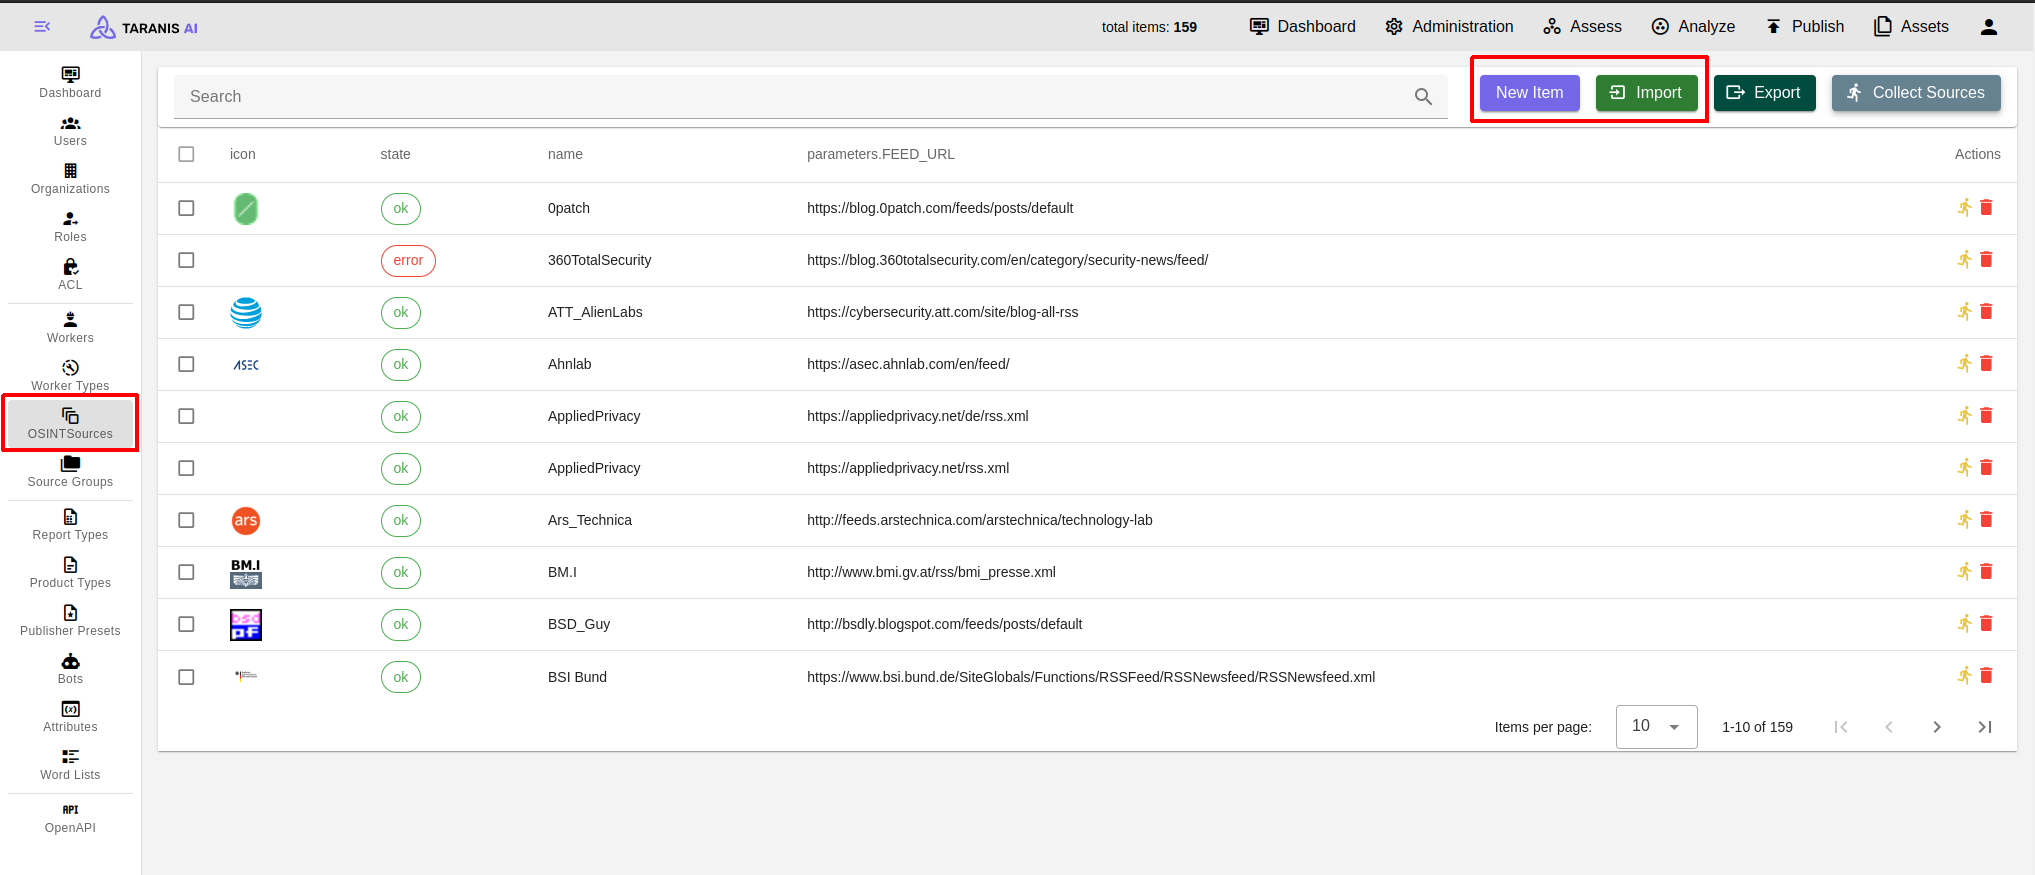
Sources for gathering data are set in the OSINTSources. It is possible to create a new source, import sources, export sources, and collect from sources.
Functionalities
Sources for gathering data are set in the OSINTSources. It is possible to:
Create a new source
- Select New Item to open editor at the bottom.
- Enter a Name and, optionally, a Description.
- Select desired collector. (See Collectors)
Import sources
Select Import and choose desired JSON file for import. (See Initial Setup)
Export sources
Select Export to download a JSON file containing your established collectors.
Collect from sources
Select Collect Sources to aggregate information from all established OSINT sources.
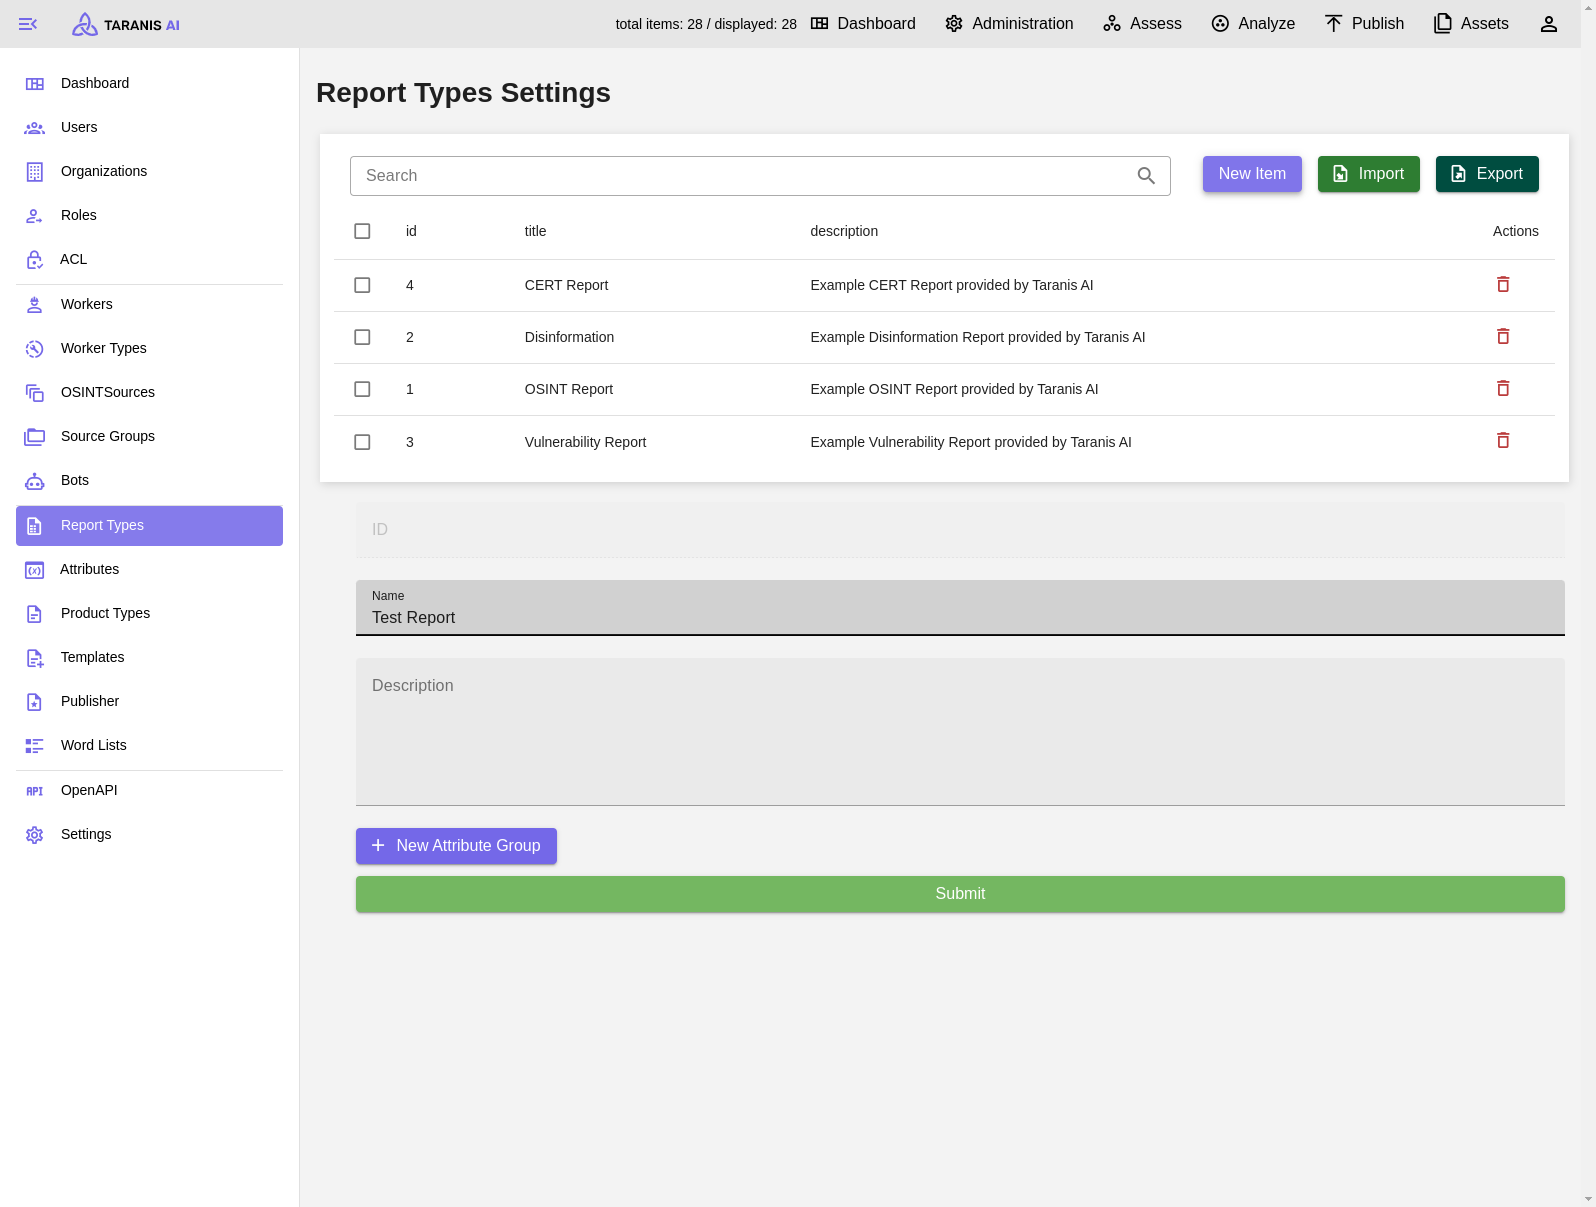
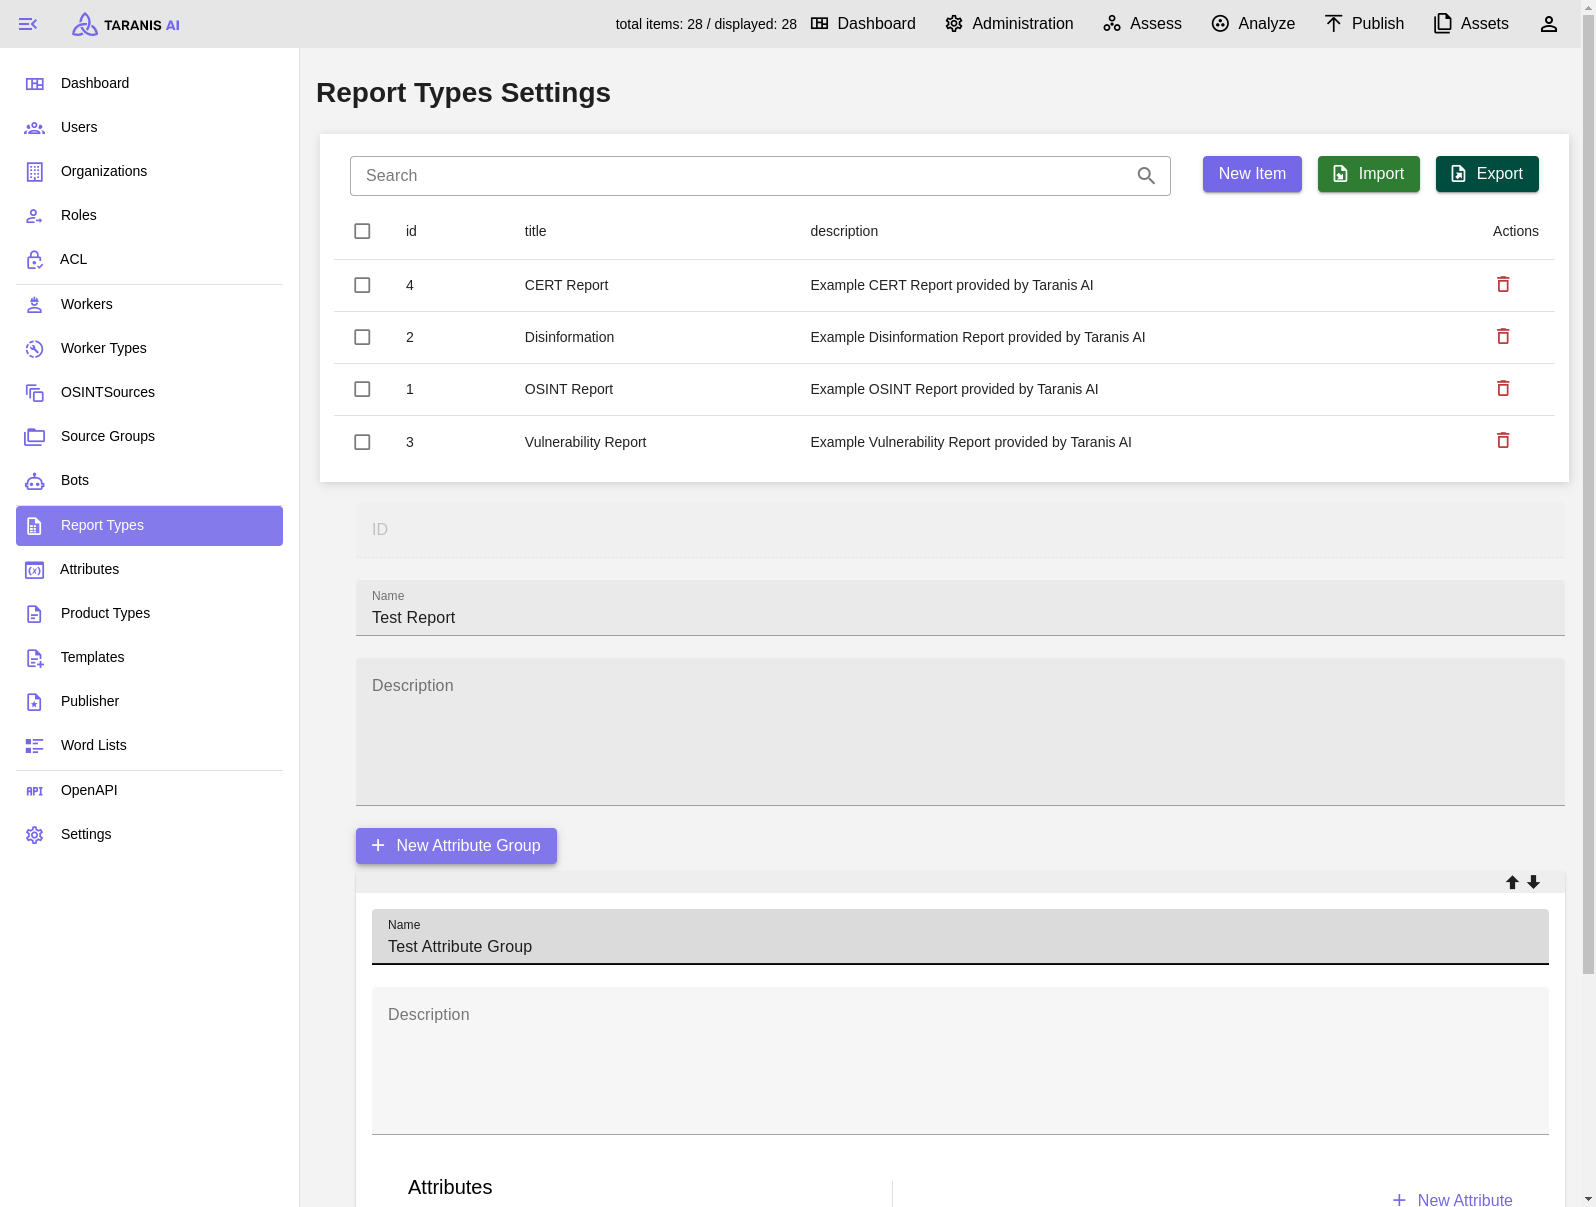
7.4 - Report Types
Admin users can manage report types (in the Administration tab). Each report type can have different attribute groups. To those groups various attributes (Text Area, Date, TLP, CPE, etc.) can be added. Attributes can be managed in Administration/Attributes.
When creating new Reports, one of the created report types have to be selected (see Analyze).
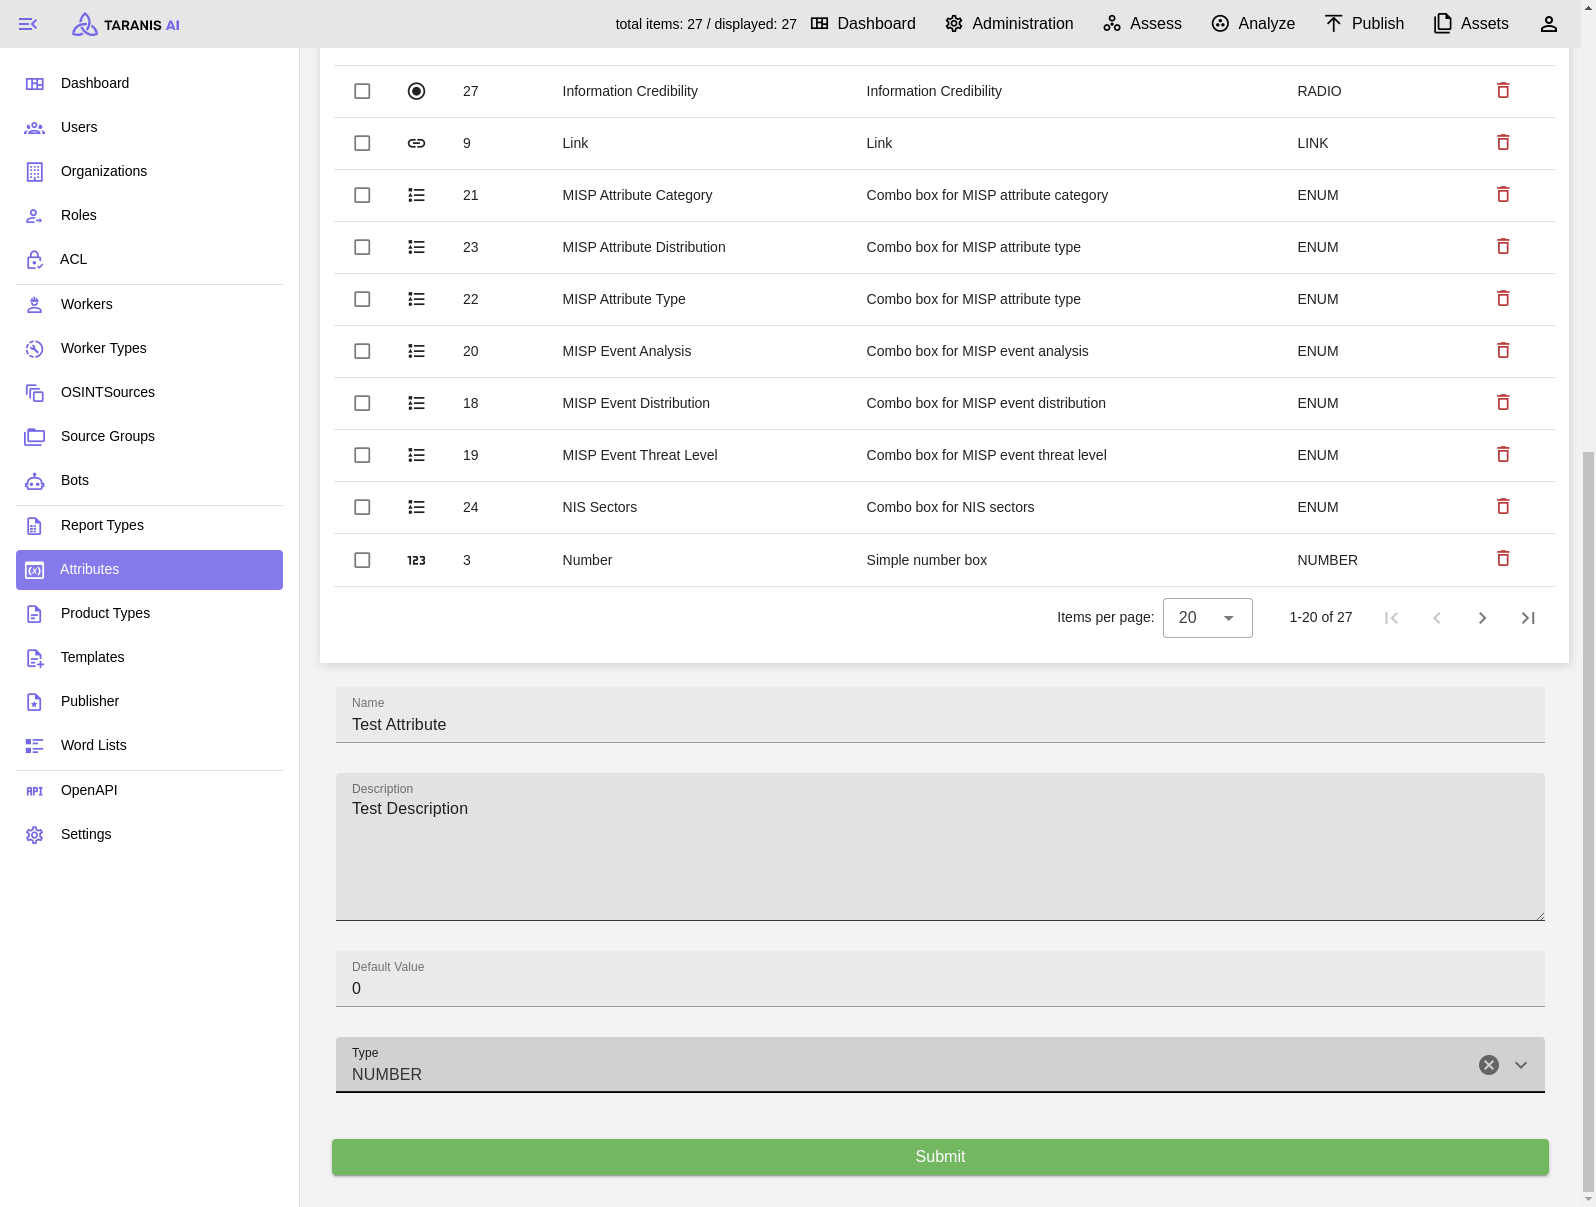
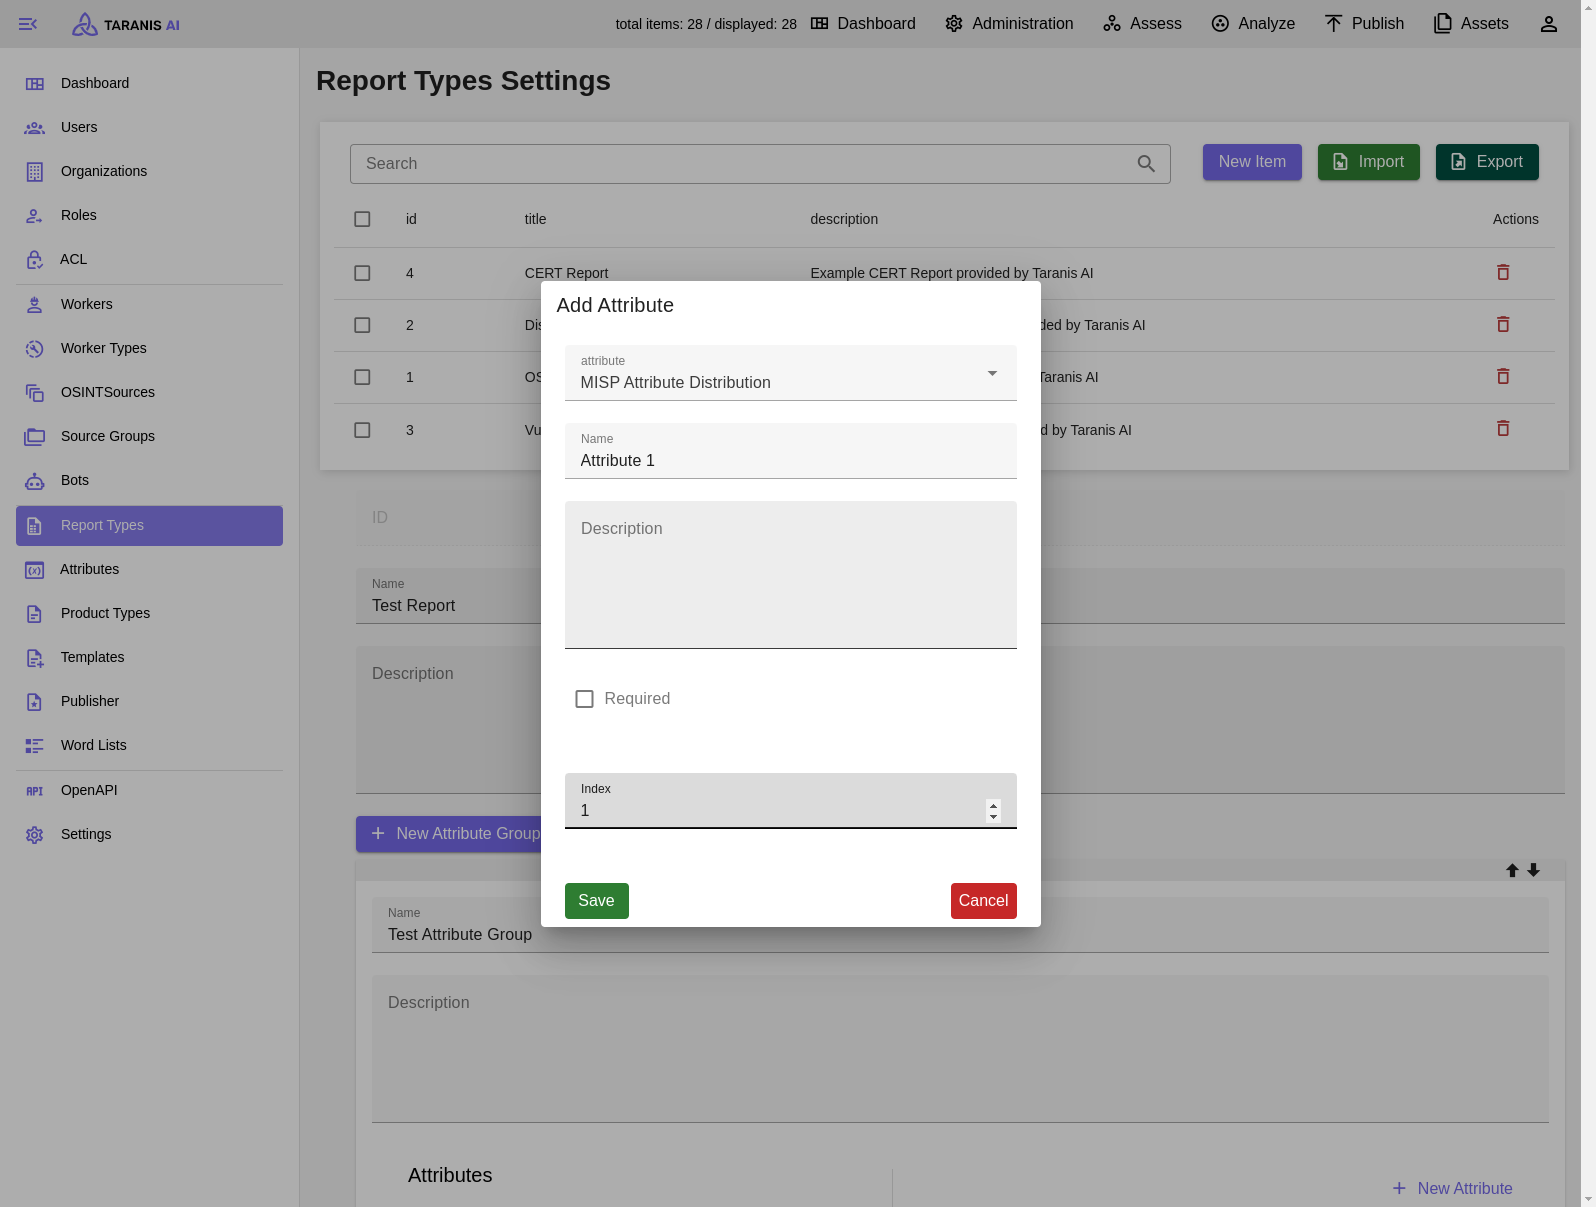
Attributes
Desired attributes need to be created first. Then they can be managed by the admin user. Besides name, description and default value also type, validator and validator parameter can be set.
Report Types - CRUD
- Create: Report types can be created (“New item”). After adding a new attribute group, different attributes can be added to this group.
- Read & Update: Report types (including their attribute groups) can be updated by clicking on them in the list. Their update will not affect Reports, which already use the Report Type
- Delete: One or multiple reports can be deleted at once.
Screenshots
Add new Attribute
Report Types - Create new Report Type
Report Types - Add new Attribute Group
Report Types - Select new Attribute from list
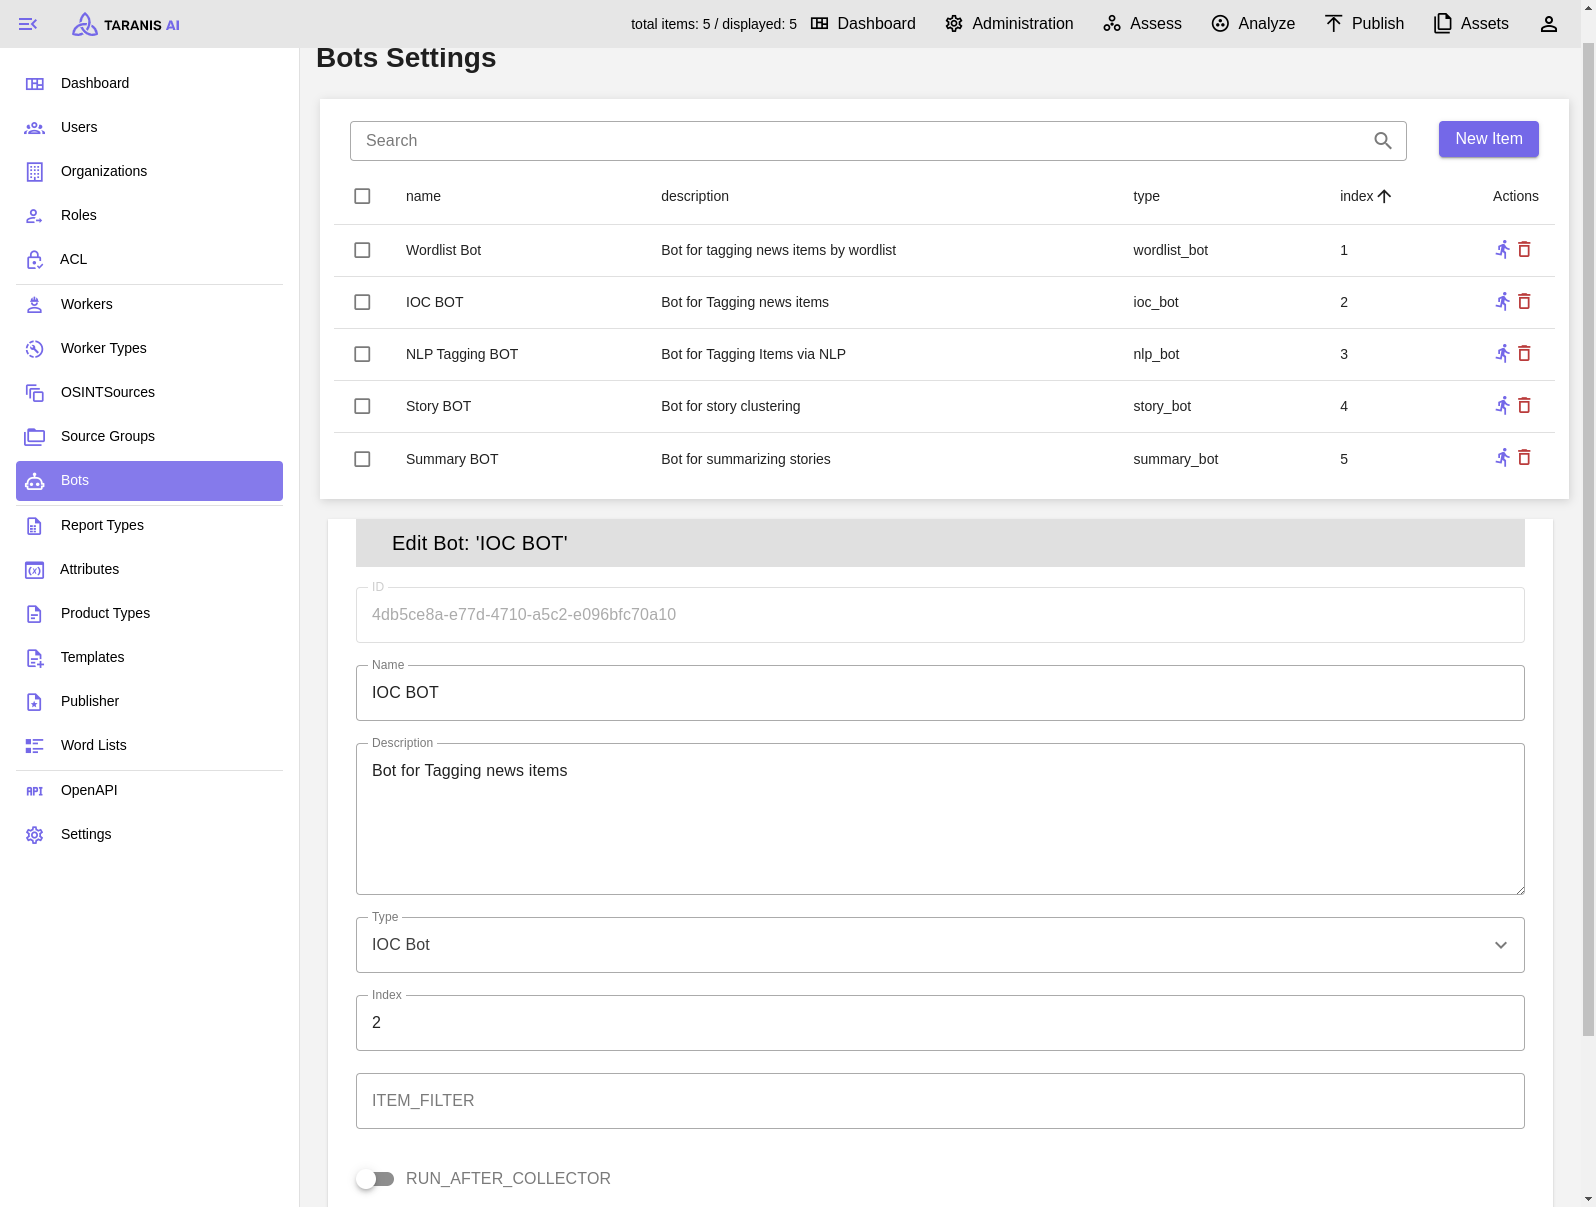
7.5 - Bots
Bots are increasing functionalities in the background
List of Bots
- IOC BOT - for tagging news items
- NLP Tagging BOT - for tagging news items via NLP
- Story BOT - for story clustering
- Summary BOT - for summarizing stories
- Wordlist BOT tagging news items by wordlist
Bot’s settings
- Name
- Descrition
- Type: Select an option based on the desired functionalities.
- Index: Specifies the execution order of bots when RUN_AFTER_COLLECTOR is enabled.
- RUN_AFTER_COLLECTOR: Executes the bot after any collector.
- REFRESH_INTERVAL: Specifies the execution interval of the bot (default is 10 minutes).
- Accepted values:
- hourly
- daily
- weekly
- number representing minutes (20 (run every 20 minutes))
- a certain time (15:44) - run every day at set time (24h time format)
- Accepted values:
7.6 - Collectors
Collectors are used to gather data from various sources.
Supported options:
The administration view now allows users to use the Preview feature to see the result of the configuration without the items being processed further for the Assess view. This feature is available for RSS, Simple Web and RT collector.
RSS Collector
RSS Collector enables Taranis AI to collect data from a user-defined RSS feed (See RSS feeds details).
- Required fields:
- FEED_URL
- Optional fields:
- USER_AGENT
- PROXY_SERVER
- ADDITIONAL_HEADERS [accepts a valid
json] (can be used to add additional headers, not all headers work as expected) - CONTENT_LOCATION (use
keyof the feed schema, from where the content for news items should be extracted (e.g.descriptionof the feed entry); if thekeyfor a feed entry is not found, it falls back to behaviour, as if the key was not entered at all) - XPATH (set this to specify the location of scraped element on the website, where the RSS feed entry points to; this is not an XPATH inside the RSS Feed)
- TLP_LEVEL
- REFRESH_INTERVAL (see Bots - refresh_interval)
- DIGEST_SPLITTING On/Off (creates News Items out of URLs present in the
Summaryfield of RSS feed) - DIGEST_SPLITTING_LIMIT (default: 30)
- BROWSER_MODE On/Off (see Browser Mode)
Basic configuration
Advanced configuration
The RSS Collector supports the use of XPath for locating elements. (See Simple Web Collector Advanced configuration)
- Example:
- FEED_URL: https://www.bsi.bund.de/SiteGlobals/Functions/RSSFeed/RSSNewsfeed/RSSNewsfeed.xml
- XPATH: //*[@id=“getting-started-web-console-creating-new-project_openshift-web-console”]
- ADDITIONAL_HEADERS:
{ "AUTHORIZATION": "Bearer Token1234", "X-API-KEY": "12345", "Cookie": "firstcookie=1234; second-cookie=4321", }
Simple Web Collector
Simple Web Collector enables Taranis AI to collect data using web URLs and XPaths.
- Required field:
- WEB_URL
- Optional fields:
- USER_AGENT
- PROXY_SERVER
- ADDITIONAL_HEADERS
- XPATH (set to specify the location of the scraped element on the website)
- TLP_LEVEL
- DIGEST_SPLITTING On/Off
- DIGEST_SPLITTING_LIMIT (default: 30)
- BROWSER_MODE On/Off (see Browser Mode)
Basic configuration
The simplest way to use this collector is to use the WEB_URL field only. By using only the WEB_URL field, Taranis-AI autonomously determines the content to be collected. Even though it is mostly reliable, sometimes it is not perfect.
Advanced configuration
When content cannot be reliably collected using the Basic configuration, adding the attribute XPATH (See tutorial how to find it), can be useful. It is crucial to specify the XPath of the precise element containing the desired data.
Configuration for Mastodon Feeds
To set up an RSS Collector for collecting posts from a Mastodon hashtag or user, follow these steps:
Finding the Mastodon RSS Feed URL:
- Hashtag Feed: Add
.rssto the hashtag URL. For example, to collect posts tagged with #cybersecurity:https://mastodon.social/tags/cybersecurity.rss - User Feed: Similarly, add
.rssto the user’s profile URL. Example:https://mastodon.social/@username.rss
- Hashtag Feed: Add
Creating a New RSS Source with Required Parameters: When creating the new RSS source, configure it with the following parameters. Here’s an example of how to fill out the fields:
- FEED_URL: Enter the RSS feed URL for the Mastodon hashtag or user (e.g.,
https://mastodon.social/tags/cybersecurity.rss). - CONTENT_LOCATION Set this to
"summary"to specify the main content location within each RSS entry. - REFRESH_INTERVAL Set the refresh interval in seconds for the frequency of updates.
- DIGEST_SPLITTING is set to
"false"since we’re not splitting entries into multiple items.
- FEED_URL: Enter the RSS feed URL for the Mastodon hashtag or user (e.g.,
Configuration for Darkweb Feeds
Extend your compose.yml with a tor service, e.g.
tor:
  image: "docker.io/dperson/torproxy:latest"
  deploy:
    restart_policy:
      condition: always
  environment:
    # LOCATION: "AT"
  logging:
    driver: "json-file"
    options:
      max-size: "200k"
      max-file: "10"
Read details about the used docker image here
The important setting is “PROXY_SERVER” in the OSINT Source you want to crawl.
RT Collector
RT Collector enables Taranis AI to collect data from a user-defined Request Tracker instance.
RT Collector collects tickets, translates all ticket attachments into individual News Items. A ticket is represented via a Story. It also collects ticket Custom Fields and saves it as key-value pairs represented with Story attributes, visible whilst Story editing. On each collector execution an update to existing Stories occurs, so editing the Story values in Taranis AI is not recommended and handling it more like read-only items is better.
Required fields:
- BASE_URL: Base URL of the RT instance (e.g.
http://localhost). - RT_TOKEN: User token for the RT instance.
- BASE_URL: Base URL of the RT instance (e.g.
Optional fields:
- SEARCH_QUERY: query to use for filtering tickets (e.g. owner=‘user1’). It is possible to check this manually by: http://<rt_address>/REST/2.0/tickets?query=owner=‘user1’
- FIELDS_TO_INCLUDE: case-sensitive, comma-separated values; example: Email, IP; if not set, all ticket custom fields are ingested
- ADDITIONAL_HEADERS
- TLP_LEVEL
- USER_AGENT
- PROXY_SERVER
MISP Collector
Until the definitions of our MISP Objects are not officially part of the MISP platform, feel free to import them manually (see MISP Objects). This allows to edit the information of News Items and Story data directly in the MISP instance without Taranis AI.
MISP Collector enables Taranis AI to collect MISP events.
Required fields:
- URL: Base URL to the MISP instance (e.g. `https://localhost)
- API_KEY: API key to access the instance (see MISP Automation API)
Optional fields:
- SSL_CHECK: if enabled, the SSL certificate will be validated
- SHARING_GROUP_ID: set to the ID of a sharing group, if only one sharing group should be collected (see Create and manage Sharing Groups).
- REQUEST_TIMEOUT
- USER_AGENT
- PROXY_SERVER
- ADDITIONAL_HEADERS
- REFRESH_INTERVAL
How MISP Collector works
Essentially it works exactly like other collectors with one exception: conflicts. Given the nature of the collaborative environment of MISP events (they can be changed in the MISP platform by the owning organisation and secondary organisations can submit change requests using the MISP proposals). Due to that, there will likely occur conflicts when attempting to update existing Stories that were, in the meantime, internally modified.
Generally, conflicts occur the moment, a Story is modified internally, and has not been pushed to MISP immediately. Therefore, it is recommended to always try to keep Stories in sync with the MISP events. To update them in MISP with the Story (see Connectors).
Conflict resolution
Conflicts can currently be resolved in the Connectors section accessible in the general and administration dashboard.
In the Conflict Resolution View it is possible to resolve given conflicts.
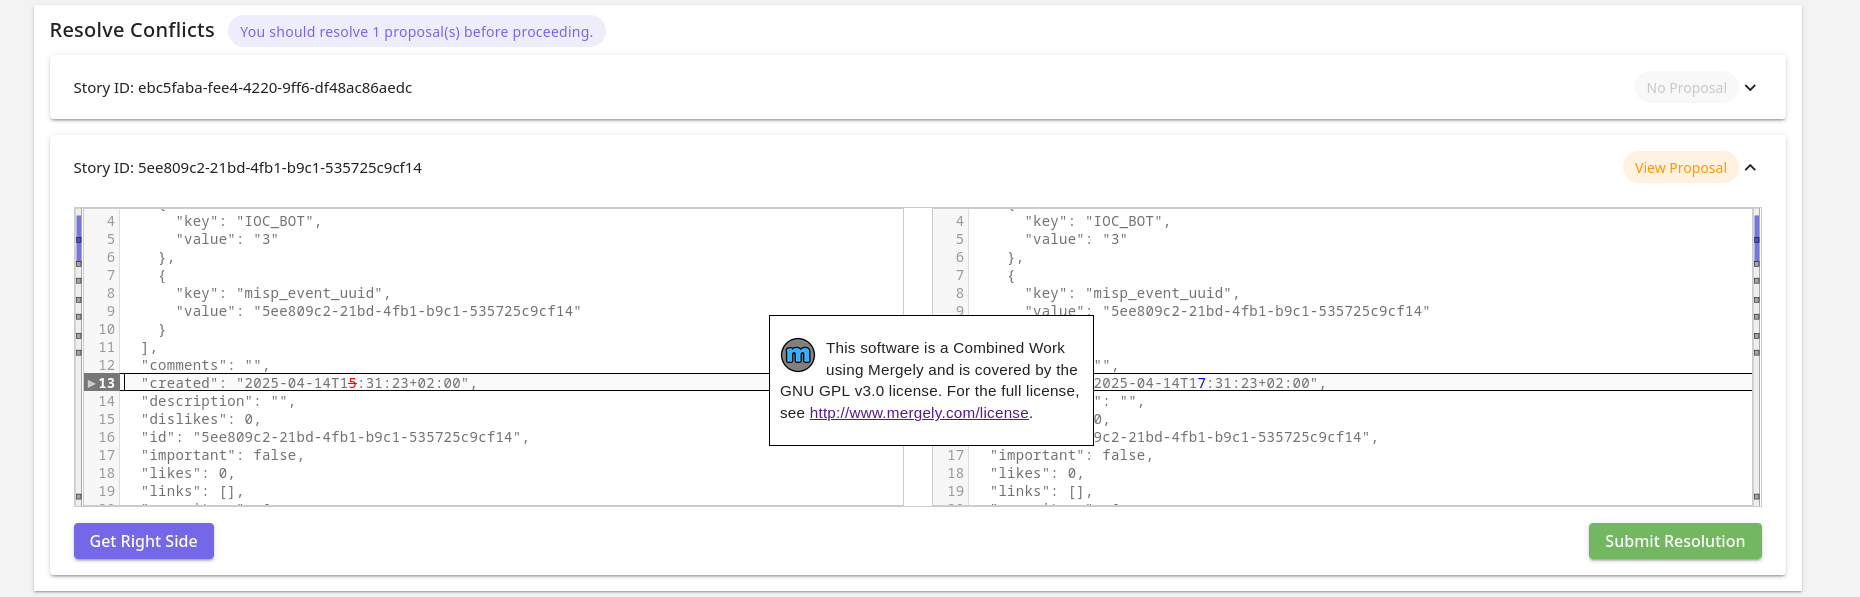
In the view, all stories that have conflicts will be shown in expandable cards. One by one it is possible to inspect them and resolve them.
At the top, the number of events (among the ones in conflict) have proposals to resolve is shown (only owned by your MISP organisation). It is recommended to resolve them first in MISP, before you resolve them in Taranis AI, so you work with the latest information. Once teh conflicts are resolved and changes are submitted, the Story will be updated without raising conflicts later on (until the Story gets modified internally). It is the users’ decision, whether they want to resolve the conflicts immediately with the version collected without proposals, or are skipped, preposals in MISP are resolved, and resolve conflicts later on next collection. In case a Story has proposals, it is possible to open the event in MISP with the “View Proposal” button.
The content on the left is the current Story. The content on the right hand side editor is the new content and is the content, which is the content that is used for the eventual update. It is possible to take the right or left side of each difference shown using the diff window by clicking the arrows on the left sides of each content window.
Both sides are freely editable and keyboard shortcuts for back and forward are supported. The context for keyboard shortcuts is decided based on where the cursor is (where it was clicked the last time - right or left side).
It is important, that the content on the right side stays a valid Story JSON.
With “Get Right Side” button, it is possible to check what content will be submitted. “Submit Resolution” button is used to submit the update.
Conflicts are stored in a temporary memory, to encourage a fresh MISP Collector recollection, before resolving conflicts and to prevent conflict resolution with outdated data.
Digest Splitting
Digest Splitting is a feature that allows the user to split all available URLs in the located element into individual News Items. The Digest Splitting Limit is the maximum number of URLs that will be split into individual News Items. If the limit is reached, the remaining URLs are dropped. The Digest Splitting Limit is set to 30 News Items by default but can be adjusted by the administrator. Useful in case of timeouts during collection of too many News Items.
Browser Mode
Collectors will fail if the web page content is only available with JavaScript. In that case it is possible to turn on the Browser Mode. All requests will have JavaScript enabled, therefore, it is slower and can use more resources.
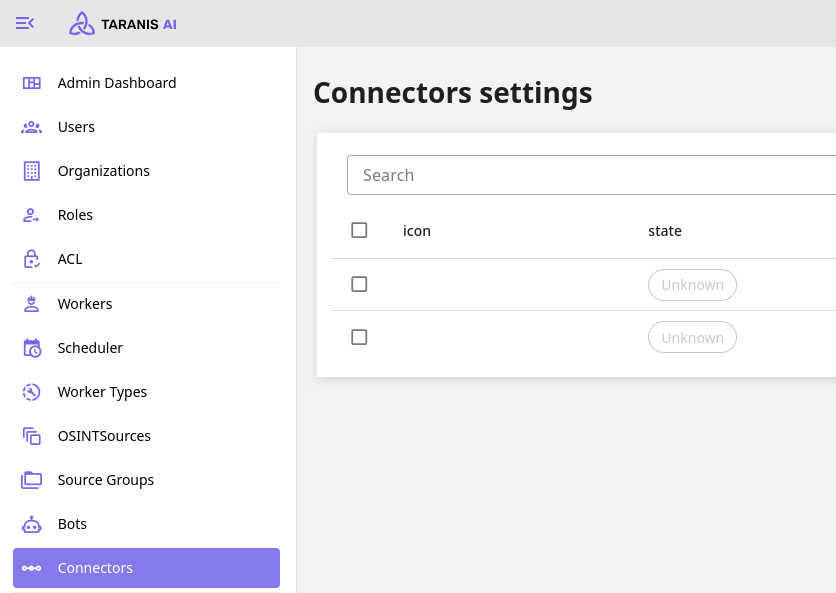
7.7 - Connectors
Connectors are used to push information out of Taranis AI (experimental)
Supported options:
MISP Connector
The MISP connector is currently in an experimental stage. Please submit issues when you discover any problems or need support with its usage.
Until the definitions of our MISP Objects are not officially part of the MISP platform, feel free to import them manually (see MISP Objects). This enables you to edit the objects of News Items and Story data directly in you MISP instances without Taranis AI.
MISP Connector enables Taranis AI to push Stories to MISP in the representation of MISP Events.
The created events contain automatically an Event Report based on the Story content (currently it encompasses the Story description and Story summary, if you feel the Event Report would benefit extending with more information, please open a feature request for it here).
First the user with administrative privileges needs to make sure, the permissions connected to Connectors usage are assigned appropriately, by default, they are not assigned to any user, not even the admins themselves. Then the Connector needs to be setup in the Admin section under the Connectors tab.
Explanation of individual permissions:
- Connector user access - ability to share a story to a Connector
- Config connector access - ability to access admin Connector configuration
- Config connector create - ability to create a Connector
- Config connector delete - ability to delete a Connector
- Config connector update - ability to update a Connector configuration
Required parameters:
- URL: Base URL to the MISP instance (e.g. `https://localhost)
- API_KEY: API key to access the instance (see MISP Automation API)
- ORGANISATION_ID: ID of your organisation, usually starts with ID=1 (It is very important that this value is correct, otherwise the tool will not work properly!)
Optional parameters:
- SSL_CHECK: if enabled, the SSL certificate will be validated
- SHARING_GROUP_ID: set to the ID of a sharing group, if you want to collect only one sharing group (see Create and manage Sharing Groups)
- DISTRIBUTION: Integer value of the distribution of the created events (see Setting distribution and Creating an event)
- REQUEST_TIMEOUT
- USER_AGENT
- PROXY_SERVER
- ADDITIONAL_HEADERS
- REFRESH_INTERVAL
Usage of the MISP Connector
To send a story to MISP, use the button “Share to Connector” in Story options in Assess. When an update to the Story is later on made, it is recommended to share the change immediately, you need to do this manually like the first time.
Before a Story is pushed repeatedly to update the MISP event, it is important to check if any proposals are pending in the MISP event, as it would override the original content of it and would make it difficult to resolve the proposals correctly.
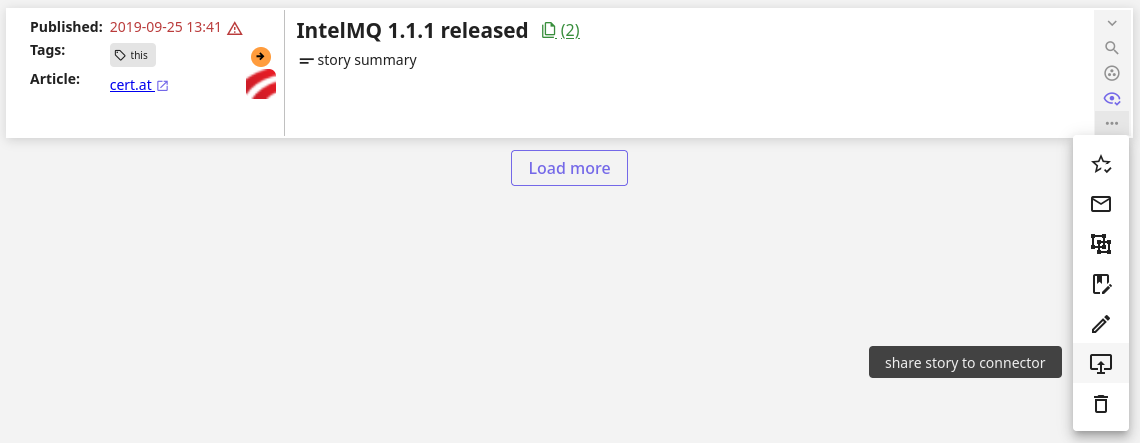
When a Story is collected, that is not owned by your configured organisation, it is possible to update it in Taranis AI and by using the same “Share to Connector” button in the Story options a proposal to the event is created. Then the owning organisation should review this proposal, and approve or reject the changes.
7.8 - Publishers
Publishers allow handling created products.
Supported options:
Email Publisher
The Email Publisher allows sending out Products.
- Fields:
- SMTP_SERVER_ADDRESS*: Address of the SMTP server.
- SMTP_SERVER_PORT*: Port of the SMTP server.
- SERVER_TLS: Enable/Disable TLS.
- EMAIL_USERNAME: Login username for the SMTP server.
- EMAIL_PASSWORD: Login password for the SMTP server.
- EMAIL_SENDER*: Sender of the email for message envelope.
- EMAIL_RECIPIENT*: Email address of the recipient for message envelope. It is possible to use only one email recipient.
- EMAIL_SUBJECT: Subject of the email.
Note: The EMAIL_SENDER and EMAIL_RECIPIENT parameters are used to construct the message envelope used by the transport agents. Message headers are not modified by these parameters in any way.
Required fields are marked with a *.
General usage
Once the publisher is created, it becomes available in the “Publish” section of each product. To send out a product via email, the product must be “Rendered” first. To render a product, use the option available in the product’s view.
7.9 - Product Types
Product Types facilitate the publication of products capable of aggregating multiple report items.
Prebuilt Product Types
- CERT Daily Report
- Default HTML Presenter
- Default MISP Presenter
- Default PDF Presenter
- Default TEXT Presenter
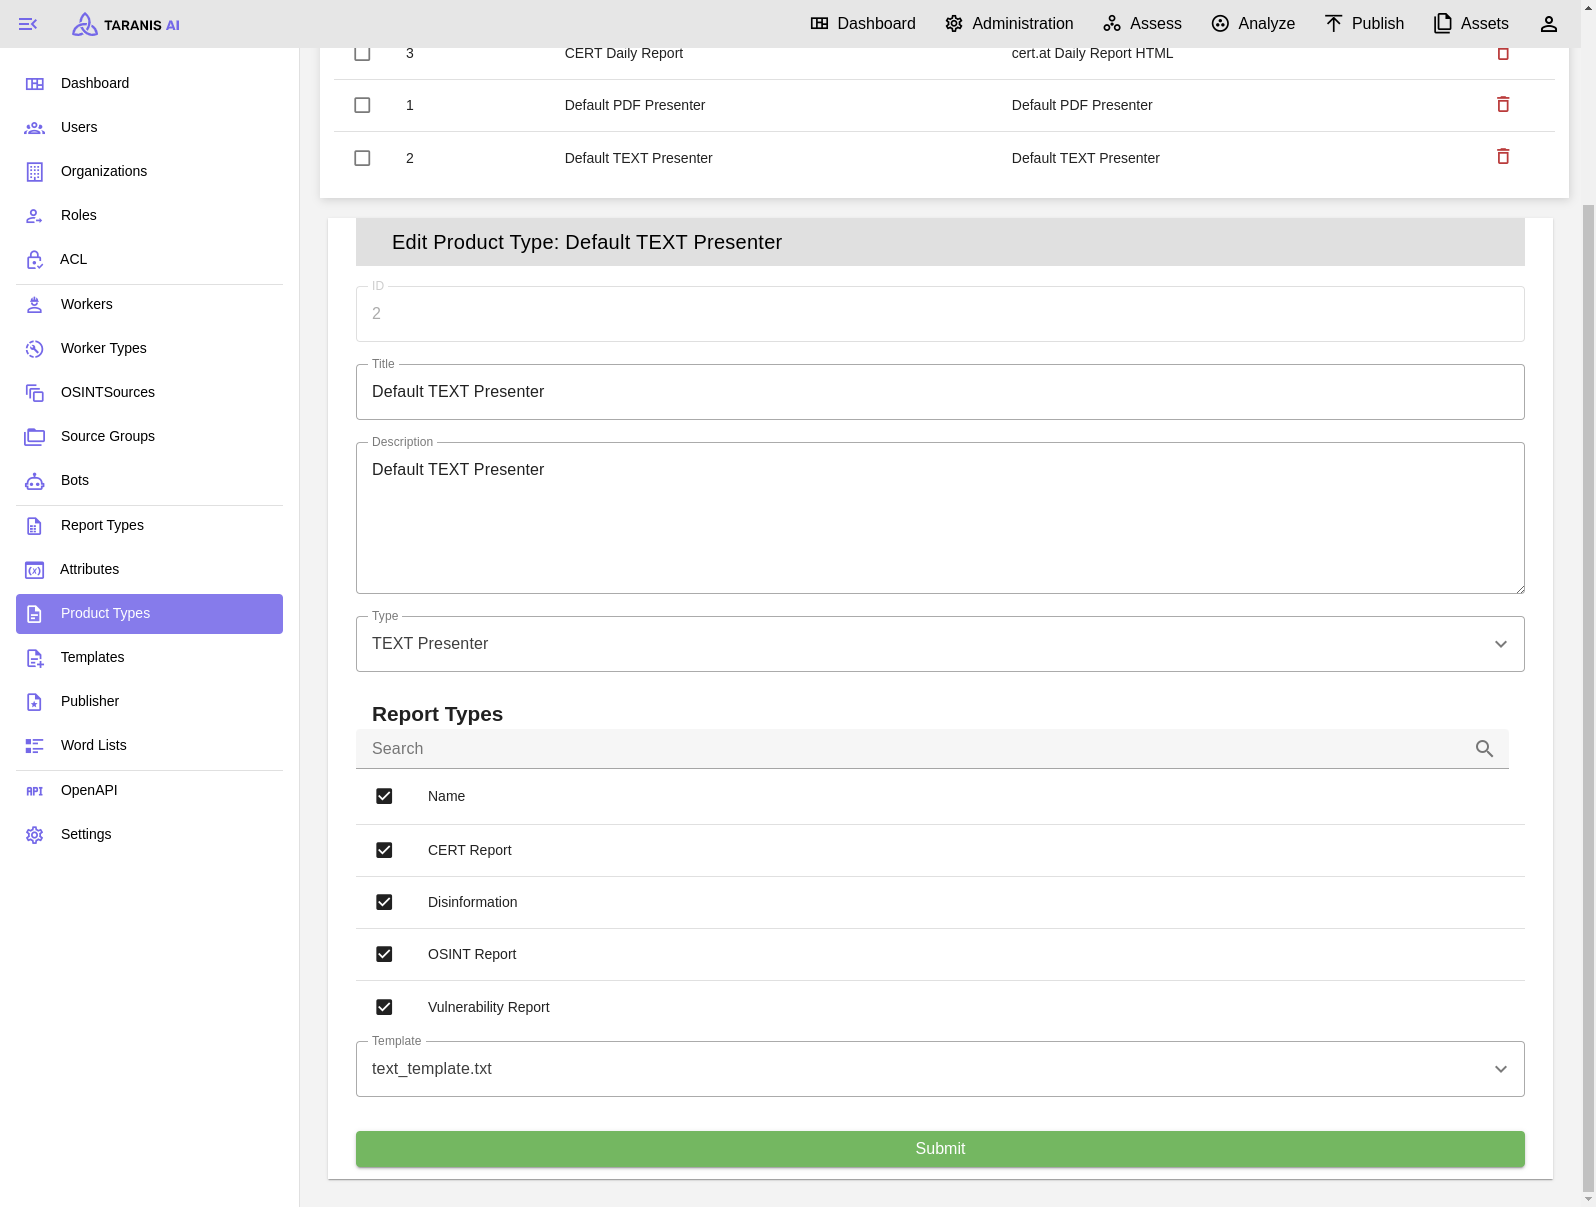
Editing Product Types
All crucial fields are editable, with the most important being Type, Template, and Report Types.
- Type: It’s the responsibility of the administrator to ensure the selected type is compatible with the subsequently provided template.
- Template: Users can select from prebuilt templates or add new ones.
- Report Types: This field determines which types of reports can be added to the products.
Create new Product Types
While there are several prebuilt product types available, users also have the option to create their own product types using custom templates.
It can be beneficial to create custom Product Types to meet desired results with the publishers.
Example of creating a simple new template using Jinja2
This is an example to render arbitrary values and loop over attributes.
- Create a new file with a unique name in
src/core/core/static/presenter_templates, - Write a custom template:
TITLE: {{ data.report_items[0].get('title') | default('No title provided', true) }}<br>
DATE CREATED: {{ data.report_items[0].get('created') | default('Not available', true) }}<br>
LAST UPDATED: {{ data.report_items[0].get('last_updated') | default('Not available', true) }}<br>
{% for name, attribute in data.report_items[0].get('attributes').items() %}
{{ name }}: {{ attribute }}<br>
{% endfor %}
If one is interested in creating own templates, it is a good to start to render the object {{ data }} first, to understand how to parse the object properly.
- Restart the Taranis AI instance.
It is also possible to copy src/core/core/static/presenter_templates/<new-custom-template.txt> to a dynamic folder src/core/taranis_data/presenter_templates so the restart is not necessary.
Advanced behaviour
If needed, templates can be utilized for more complex renderings by leveraging custom attributes.
Currently, this functionality is demonstrated in the text_template.txt file, where the attribute omission of type “Omit Keys” allows for the exclusion of unnecessary attributes from publication. To employ this feature, the administrator simply needs to add this attribute to the relevant report type. Then, within a specific report (Analyze View), they can specify the attributes to omit by listing them as comma-separated strings.
It is essential to ensure that the “Name” used for the report type attribute matches exactly with the key used in the template.
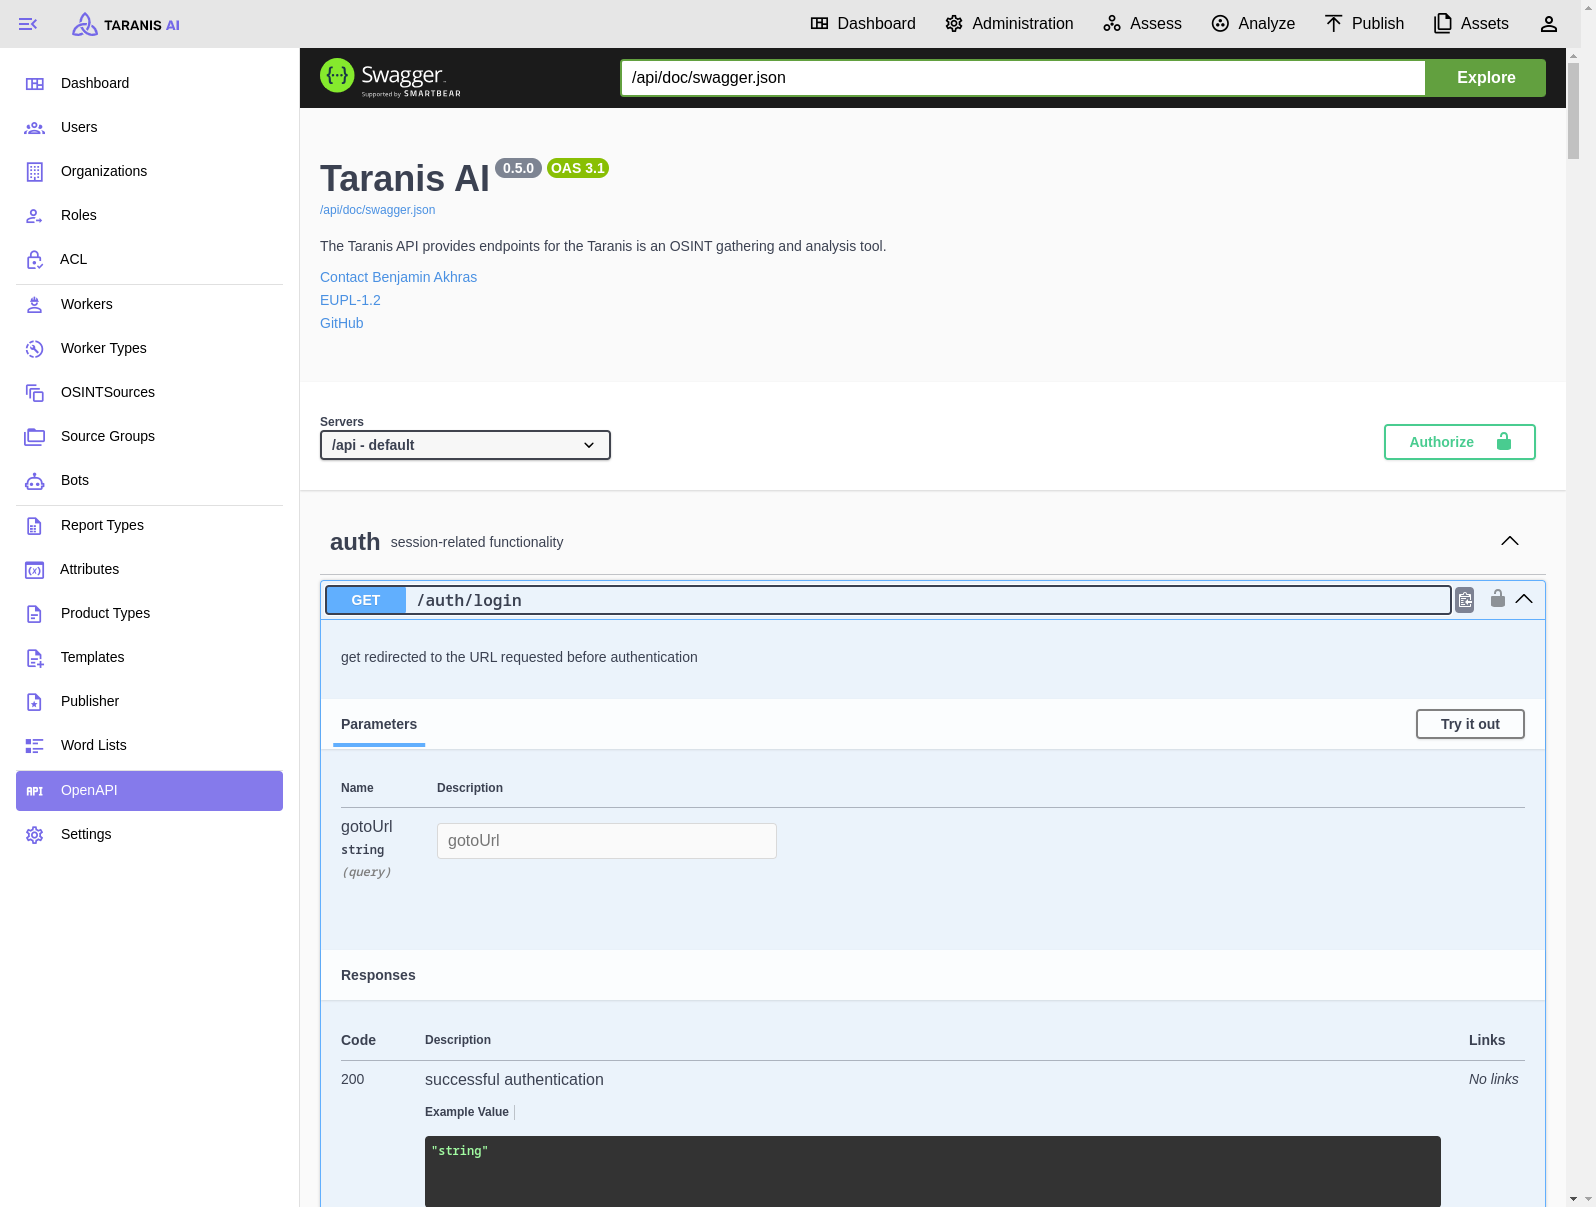
7.10 - OpenAPI
The admin user can access the Taranis API through Swagger UI. Swagger UI displays OpenAPI specifications as an interactive API documentation.
Description
The admin user can access the Taranis API through Swagger UI. Swagger UI displays OpenAPI specifications as an interactive API documentation.
Functionalities 👤
see: Swagger UI
Screenshots
Taranis instance is alive
8 - User Stories
User Stories as seen from the perspective of an analyst
8.1 - User Stories [Admin]
User Stories as seen from the perspective of an Taranis AI Administrator.
Configure Sources
As an admin, I need to configure OSINT sources to be gathered for intelligence gathering purposes.
Word Lists
As an admin, I need the ability to utilize Word Lists for filtering news items during collection or enhancing them with a Bot. This includes the capability to import and export word lists and apply them based on their designated usage, such as adding tags with the word_list_bot.
Configure Report Types
As an admin, I need the ability to configure new report types.
Configure Users
As an admin, I need to manage user accounts by creating and deleting users, ensuring they have the necessary access for their tasks.
Configure ACLs and roles
As an admin, I need to configure Access Control Lists (ACLs) and roles to define permissions for each role. This allows me to effectively manage user permissions, control access to sensitive information, and maintain compliance with organizational policies and regulations.
8.2 - User Stories [Analyst]
User Stories as seen from the perspective of an analyst
Topics Dashboard [Dashboard]
As an analyst, I require access to a Topics Dashboard feature that displays the most important news topics. This dashboard should prioritize the most frequently occurring tags, offering a snapshot of the prevailing themes and subjects within the collected news items.
Assess Stories [Assess]
As an analsyt, I want to review all stories gathered in a fixed time period. I want to be able to set a stard and end date for items to be displayed. If I set these time limits I want to display Stories with pageing otherwise there will be an infintescroll representing the everchanging nature of stories.
Search, Filter and Sort [Assess]
As an analyst, I need the capability to search for news items by entering any text string. To provide a ranked list of results based on the relevance to the search query, enabling me to quickly and effectively identify the most pertinent articles for further analysis.
Vote on Story [Assess]
As an analyst, I want to mark news items as important by voting on them. To allow me to quickly identify and categorize significant articles for easy retrieval at a later time. Each Story includes buttons for down and up voting as well as for marking an story as important. Via a shortcut (ctrl+i) I can mark all selected stories as important.
Mark as read [Assess]
As an analyst, I want to mark news items as read to prevent myself and other anlyst from viewing the same story multiple times. Each Story contains a button to mark a story as read or unread if already marked as read. The same behaviour can be toggled via a shortcut (ctrl+space).
Tags [Assess]
As an analyst, I need the ability to filter news items based on tags, attributes, or important keywords. To allow me to quickly find relevant news items by applying a tag filter within the tool. The interface should provide an option to enter or select tags, and display the filtered results. In scenarios where no news items match the selected tags, it should result in an empty story list.
Create and edit News Item [Assess]
As an analyst, I need a feature that enables me to create news items, specifying details such as title, publish date, review, link, article content, and attributes. To maintain data integrity, the editing function will be disabled for any news item once it is included in a report. For ease of use, each news item has an edit button in the Asses view.
Manage Report [Analyze]
As an analyst, I want to create and edit reports directly within the Analyse view. I can create reports from predefined list of report types managed by an administrator. I can edit the metadata of this report, and add Stories to it. I can mark the report as “completed” to allow further processing and publishing.
Manage Product [Publish]
As an analyst, I require a feature to create reports directly within the Analyse view. I can create reports from predefined list of report types managed by an administrator. I can edit the metadata of this report, and add Stories to it. I can mark the report as “completed” to allow further processing and publishing.
Publish Product [Publish]
As an analyst, I want to publish the findings of a report. So they can be viewed outside of Taranis AI. I can choose only Reports that match my Product type. I can render a preview of the Product before sharing. I can choose the destination where to publish from a predefined list (publishers) managed by an administrator.
8.2.1 - Workflow [Analyst]
End to End ‘user flow’ for an analyst.
Upon logging in, the analyst is greeted by the Dashboard which prominently displays the most significant tags, offering a quick overview of trending topics and themes. This view sets the context for the analyst’s tasks ahead.
To enhance workflow efficiency, please review the available hotkeys. Additionally, for simplified filtering, set the “End of Shift” time in the user settings. This feature allows the system to display only articles published since the last end of shift, ensuring you see content that hasn’t been reviewed yet.
Assess
To assess your items, go to the Assess section and set the time filter. Apply the “not read” and “not important” filters. Mark as read any items that have been read but are considered unimportant. Continue working through these items until all are marked as read, focusing only on checking summaries.
Next, set the filter to “not read” and “important”. Verify the importance of each item and mark it as read if not important. Check whether the item is part of an older report and determine if it still adds value. If not, remove the “important” tag and mark the item as read. If multiple items discuss the same topic, merge them.
To update a summary manually or with AI, first click the “Edit Story” button. Then, you can either edit the summary yourself or use the “Summarize with AI” for a quicker option. Send important or sector-specific items via email. Optionally, you can upvote or downvote items and add them to the relevant reports.
Finally, remove the “important” tag and mark the item as read. For greater efficiency, consider using the time filter to focus on the most recent content.
Additional tasks during assess
During the review process in the Assess tab, the analyst has several tools at their disposal to optimize their workflow:
Voting on Stories: The analyst can vote stories up or down and mark them as important using buttons or the shortcut (Ctrl+I). This helps highlight stories of particular relevance.
Mark as Read: To maintain efficiency and avoid redundancy, the analyst can mark stories as read or unread using a button or the shortcut (Ctrl+Space).
Tags: Tag filters can be applied to narrow down the selection to the most relevant articles, improving focus. If a story needs editing or creation, the analyst can do so directly within the Assess tab, where news items can be adjusted until they are locked into a report. This ensures the content remains fresh and accurate.
Once all relevant stories are collected and reviewed, the analyst moves to the Analyze tab to finalize the report and mark it as completed. This step transitions the process from review to dissemination
Analyze
To analyze your items, go to the Analyze section and review them as done in Assess by merging and removing items. Ensure everything is ready for a final review. Add news items to the appropriate categories, save, and mark the process as completed.
Publish
Finally, the Publish tab is where the compiled report transforms into a product ready for external consumption. The analyst chooses a product type that fits the report, reviews the final product via a rendered preview, and selects a publication destination from a managed list. This final step disseminates the insights gathered and analyzed, extending the impact of the analyst’s work beyond the confines of Taranis AI.
9 - Contribution Guidelines
How to contribute to the docs
See https://github.com/taranis-ai/.github/blob/master/CONTRIBUTING.md