This is the multi-page printable view of this section. Click here to print.

Return to the regular view of this page.

Assess

Assessing News Items and Stories

Description

Assess is the analyst queue for collected Stories and News Items. It supports search, filtering, sorting, merging, bookmarks, report assignment, connector sharing, and review state changes.

Functionalities

Use the Assess sidebar search for Story text search inside the current Assess view. Use the global Omnisearch field to search across Stories, Reports, and Products, or to open Assess with filter tokens such as:

story: source:"CERT.at" tag:ransomware read:false range:last7

For natural-language questions and summaries, use Chat when enabled. Search answers link back to Assess with the generated filters applied.

Filters
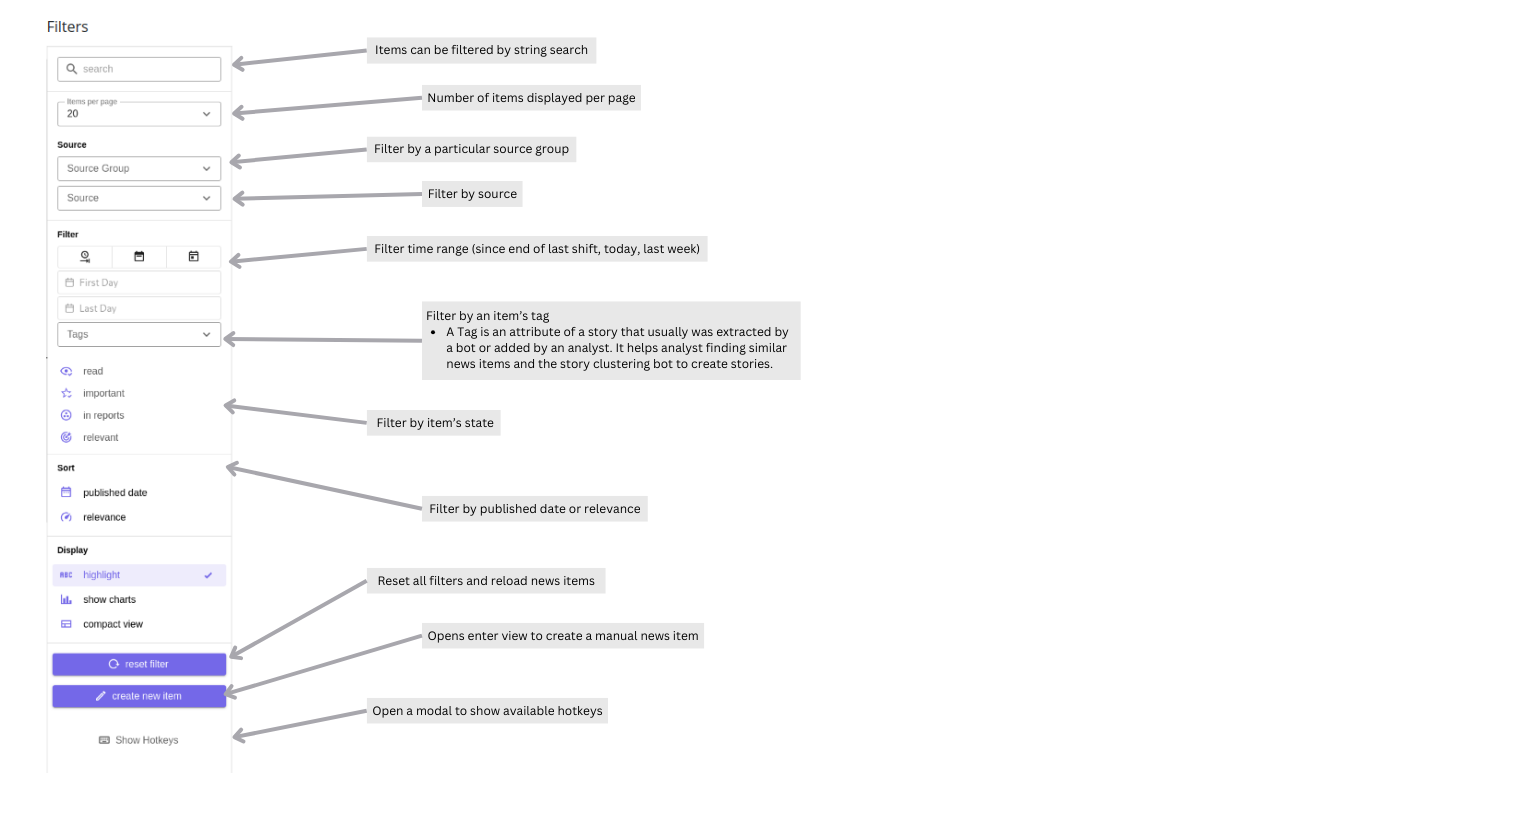
AssessFilters

Details:
  • First Day: The Story’s creation date, typically matching the oldest News Item’s “published date.”
  • Last Day: The Story’s update date, usually reflecting the latest addition or change.

For manually created stories, the “updated” timestamp is essentially the creation time. As a result, filtering by Last day for a manually created story will not return it, even if an older “published date” is set.

Assess filters include search text, source, source group, tag, language, read state, important state, report membership, relevance, cybersecurity classification, changed-by actor, date range, and sort order.

Users can save the current Assess filters from the Saved filters button. A saved filter can be marked as the default for the user profile. Dashboard shortcuts show saved Assess filters so frequently used queues can be opened directly. See Filter Lists and Saved Filters.

Items

News items collected by Collectors become visible in Assess. They can be grouped into Stories automatically by Bots or manually by analysts.
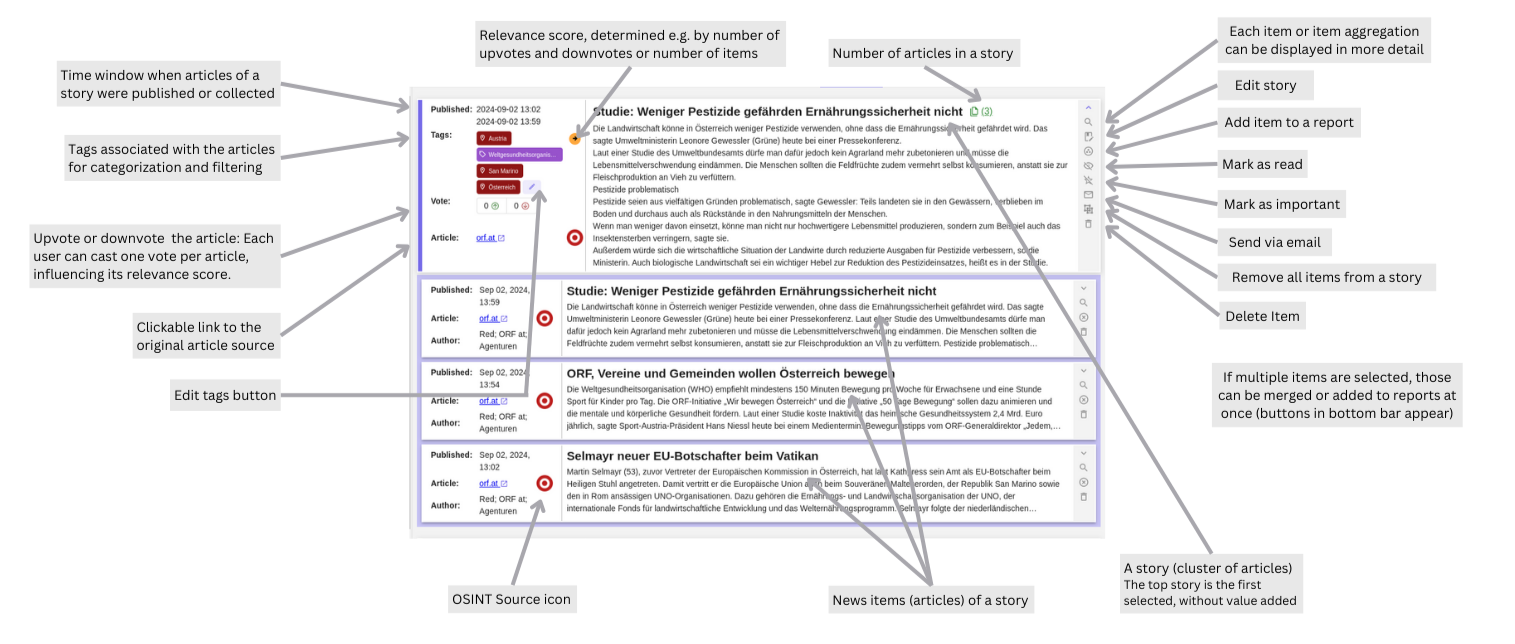
AssessStory

Detail view:

  • Relevance of item/aggregate can be changed with “up/down” buttons

Charts:

  • Each item displays a chart if data has been aggregated in the last 7 days.
  • Line and bar chart display the same data, which is the accumulation of items per day.
  • The y-axis of the line chart can be adapted and is the same for all charts in the current items list. Therefore, charts can be compared properly.

Story actions include marking read/unread, marking important, sharing to connectors, ungrouping, version history, deleting, editing, adding to reports, and bookmarking. Bulk actions are available after selecting stories; visible shortcuts include Shift+R for adding to a report and Shift+B for bookmarking.

Story import and export

Use Share → Export to JSON to transfer an individual Story or a selection of Stories. Import either an Assess or Admin export through Create manual news item → Create from file or Admin → Settings → Import Stories. Both import screens accept complete Stories, including exports with metadata.

Stories are the primary transfer format. Existing standalone News Item JSON can also be imported; each item receives a new parent Story. Transfers do not restore all instance state and do not merge or overwrite existing content. See Story import and export for formats, permissions, and limitations.

Version history

Stories keep a revision history. Use Version History from the Story actions menu to inspect saved revisions and compare the changes between adjacent revisions. Revision diffs are intended for audit and troubleshooting; they do not currently provide rollback.

Bookmarks

Bookmark collections are private per user. A story can be bookmarked from its action menu, or selected stories can be added to an existing or new collection from the Assess toolbar. If a user bookmarks a single story before creating any collections, Taranis AI creates a default collection named Bookmarks.

The Assess page shows up to six bookmark collections in a compact bar. Use All bookmarks to open the full bookmark page, rename or delete collections, reorder them, and remove stories from a collection. Removing a story from a bookmark collection does not delete the story from Assess. See Bookmarks.

Story Edit Advanced View

The Story Edit view can expose AI assisted actions when advanced story options are enabled in user settings. Available actions include generating a summary and title, and running sentiment analysis. When sentiment attributes are present, the advanced view shows the story sentiment status.
1 - MISP Auto-Update

Automatically synchronize Stories to MISP events

MISP Auto-Update pushes Story changes to a selected MISP connector after five minutes without further changes. It is experimental.

Prerequisites

Enable it

  1. Open a Story for editing and select the Advanced layout.
  2. Under MISP auto-update, select a MISP connector and enable auto-update.
  3. Save the Story.

The initial push, and every later eligible change, is scheduled five minutes after the last change. Changing the connector reschedules the push; disabling auto-update cancels it.

Behavior

  • An unsent Story creates a MISP event on its first automatic push.
  • Existing events are updated only when owned by your organization. Auto-update skips unowned events.
  • External MISP proposals block automatic updates. The Story editor displays a link to the event; resolve the proposals, then change the Story to schedule another push. A successful automatic push clears the warning.
  • Share to Connector can still push manually, including when auto-update is blocked.
  • Enabled Stories show a badge on their cards. Inbound MISP and conflict-resolution changes do not trigger auto-update.

What is synchronized

  • Story title, description, comments, summary, tags, attributes, links, and event report.
  • Added and removed news items. Changes to an already-synced news item do not update its MISP object.

Story edits, news-item and tag changes, report membership changes, and Story-modifying bot operations schedule an update.

Troubleshooting

If no update occurs, confirm auto-update is enabled, the connector works with a manual push, your organization owns the existing event, and no proposal warning is shown. For a proposal warning, resolve the proposals and make another Story change.

2 - Filter Lists and Saved Filters

Use dynamic Assess filter lists and save reusable queues.

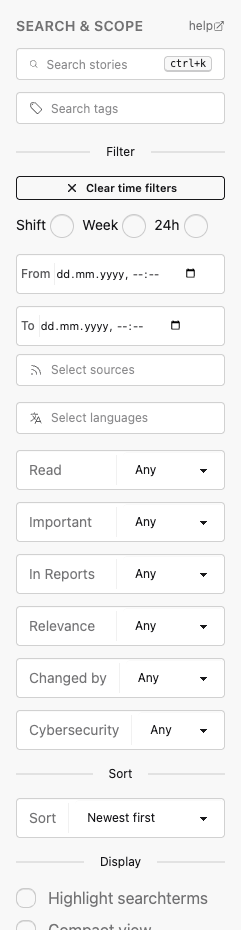
Assess filter lists are the dynamic option lists behind the sidebar filters. They are built from the current data in Taranis AI and include Sources, Source Groups, Tags, and Languages.

Assess filter lists

Filter lists are not manually maintained lists. The core API exposes them through /api/assess/filter-lists, and the frontend may cache them per user. Assessment changes invalidate the cached filter lists so new Sources, Tags, and Languages become available without a restart.

Use the sidebar to combine:

  • Search text and Tags.
  • Time presets or exact date ranges.
  • Sources and Source Groups.
  • Languages.
  • Read, Important, In Reports, and Relevance state.
  • Changed by, Cybersecurity status, and Sort order.

Saved filters

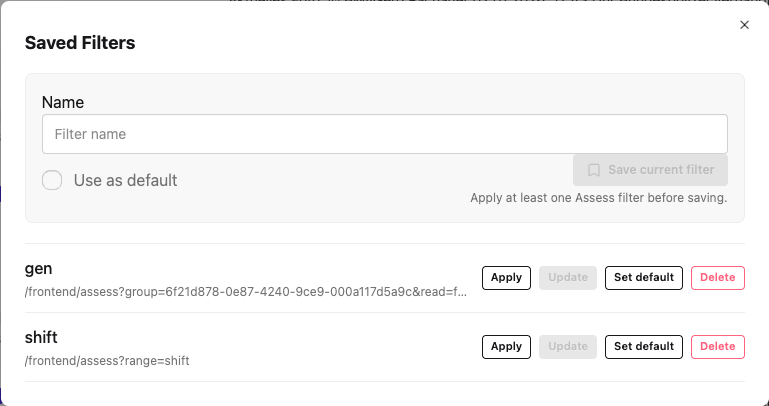
Saved filters store the current Assess sidebar state in the user’s profile. They are private to the user and are useful for recurring queues such as shift review, unread important Stories, or language-specific monitoring.

Saved filters dialog

Open Saved filters from the Assess sidebar. Saving requires at least one active filter. Saving with an existing saved-filter name updates it; saving duplicate filter criteria under another name is rejected.

One saved filter can be marked as the default. When a default exists, opening /assess without query parameters opens that queue automatically. Use /assess?reset=true to bypass the default and open the unfiltered Assess list.

Saved filters also appear as Dashboard shortcuts. Dashboard cards can be applied directly or deleted from the Dashboard.

3 - Bookmarks

Save private Story collections for follow-up work.

Bookmarks let each user keep private collections of Stories without changing the Stories themselves. They are useful for follow-up queues, handovers, and temporary research sets.

Bookmark collections

From Assess

Use the Story action menu to bookmark one Story. If the user has no bookmark collections yet, Taranis AI creates a default collection named Bookmarks.

For bulk work, select Stories in Assess and use Bookmark in the toolbar. The dialog can add selected Stories to an existing collection or create a new collection.

The Assess list shows up to six bookmark collections in the bookmark bar. Use All bookmarks to open the full bookmarks page.

Bookmarks page

The bookmarks page supports:

  • Creating a new collection.
  • Opening a collection.
  • Renaming a collection.
  • Dragging collections to reorder them.
  • Deleting a collection.

Deleting a bookmark collection only removes the collection. It does not delete the Stories from Assess.

Inside a collection, select Stories and use Remove selected to remove them from that collection. Story access still follows the user’s normal permissions and TLP visibility.

4 - Story import and export

Share Stories between Taranis AI instances and import existing News Item JSON.

Stories are the primary unit for importing and exporting content. Export a Story to transfer its grouped News Items together. Standalone News Items are a secondary import format for existing JSON from an API or another integration; a separate News Item export workflow is not supported or required.

Choose a workflow

GoalWorkflowResult
Share selected StoriesAssess → select Stories → Share → Export to JSONSelected Stories with their News Items and metadata. The same action is available on an individual Story.
Transfer content across an instance or date rangeAdmin → Settings → Export StoriesAn instance-wide export, optionally restricted by Story creation date, with a choice of minimal content or metadata.
Import a Story export as an analystAssess → Create manual news item → Create from fileImports complete Stories, despite the manual News Item page title.
Import a Story export from SettingsAdmin → Settings → Import StoriesUses the same importer as Assess.
Add an individual articleAssess → Create manual news itemEnter content manually or use Create from URL. Use Create from file when you already have News Item JSON.

Export selected Stories in Assess

Open Share on a Story, or select multiple Stories and use the bulk sharing action. Choose Export to JSON.

The download includes Story and News Item attributes and News Item tags. Its JSON envelope is { "total_count": ..., "items": [...] }.

Export requires Assess access (ASSESS_ACCESS), read access to every linked source, and access to the TLP levels of both the Stories and their News Items. Read-only source access is sufficient. If any selected Story is missing or inaccessible, the whole export fails without downloading a partial file. Reload Assess and retry with an accessible selection.

Export Stories in Admin Settings

Open Settings → Export Stories and choose:

  • All Stories: Story IDs and creation dates, plus News Item IDs, titles, and content. Other metadata is omitted; imported Story titles are derived from their News Items.
  • All Stories With Metadata: Story content and metadata, including Story attributes and detailed News Items with attributes and tags.

Both downloads are JSON arrays. Both can be imported through either import screen without manually removing metadata to make the format compatible.

Admin export requires ADMIN_OPERATIONS and covers the instance without the content ACL filtering used by Assess exports. Use Assess export when you only want to share selected accessible Stories.

From and To filter the Story’s creation time, with inclusive bounds. Enter dates in your profile timezone, shown beside the form; Taranis converts each boundary to UTC using the applicable daylight-saving offset. Blank bounds are optional. From alone ends at the current time. Future dates, reversed ranges, and local times skipped or repeated during a daylight-saving transition are rejected.

Import through Assess or Settings

Upload the JSON file using Create from file in Assess or Import Stories in Settings. Both entry points use the same import behavior and require ASSESS_CREATE at the API. Access to the Settings screen does not define a separate import format.

Input fileAssess Create from fileSettings Import Stories
Assess Story exportSupportedSupported
Admin minimal Story exportSupportedSupported
Admin Story export with metadataSupportedSupported
Single Story object or array of StoriesSupportedSupported
Single News Item object or array of News ItemsSupportedSupported

Do not mix Story objects and standalone News Item objects in the same array. Successful imports from Create from file return you to Assess.

Standalone News Items

Use this secondary format when an integration supplies individual News Items instead of grouped Stories. For example:

{
  "title": "Example article",
  "content": "Article text supplied by an integration.",
  "source": "Example publication",
  "link": "https://example.com/article"
}

Each imported standalone News Item receives a new parent Story so it appears in Assess. An exported story_id is ignored in this case; importing individual items does not recreate their former grouping or add them to an existing Story. Import a complete Story when you need to preserve its grouping.

Transfer limits

  • No merging or overwriting: exported IDs are retained. An existing ID or duplicate News Item hash causes the entire import to fail. Invalid batches also roll back completely. Re-importing an export into an instance that still contains that content is not an update workflow.
  • Sources are not created by a Story import: a source reference that exists in the destination can be retained; a missing reference falls back to the manual source. Minimal exports omit source references and therefore use the manual source.
  • Metadata depends on the export: minimal Admin exports omit tags, attributes, links, and other metadata. Assess and Admin metadata exports retain supported metadata, but are not full copies of the originating instance.
  • These are content transfers, not backups: bookmarks, individual user votes, report relationships, and local ordering settings are not restored. Import creates a new revision record rather than restoring the original revision history.

Review the imported content and its destination source before continuing your normal Assess workflow.
